Author: Stirna Consulting

  • The AI Scaling Problem: Why Millions Are Spent on Pilots That Nobody Uses (And How to Fix It)

    Applying a Realist Evaluation Framework to Public Sector AI and Climate Governance

    Artificial Intelligence is firmly on the agenda of governments worldwide. From the Republic of Korea to Spain, and India to Brazil, IT leaders and ministers are actively defining policies to apply AI to modernize public sector organizations, vastly improving the effectiveness and efficiency of administration.

    The ambition is staggering. As highlighted during the recent OECD global report launch for Governing with Artificial Intelligence, the UK estimates that AI could automate 84% of repetitive public service transactions, saving the equivalent of 1,200 person-years of work annually. In Brazil, the government has introduced a strategic plan to avoid climate disaster in the Amazon using AI-enabled environmental monitoring systems.

    Yet, despite these ambitious modernization programs, governments face a growing crisis: the rise of failed implementations. Millions are spent on AI solutions that do not scale or never progress past the pilot stage.

    Why are these transformative initiatives failing to deliver genuine public value? The answer lies not in the technology, but in inappropriate evaluation methods.

    The OECD Framework and the Evaluation Trap

    To guide leaders in their AI-enabled modernization programs, the OECD (2025) proposed the Framework for Trustworthy AI in Government. It is built upon three broad pillars:

    1. Enablers: The foundational building blocks required to facilitate AI adoption, including data, digital infrastructure, skills/talent, and governance mechanisms (such as AI accelerators and innovation hubs).
    2. Guardrails: The binding and non-binding instruments needed to guide trustworthy use, encompassing risk management, transparency, accountability, and robust oversight.
    3. Engagement: Approaches to shape user-centered adoption by actively involving citizens, civil servants, and stakeholders to ensure AI is responsive to societal needs.

    However, even with these pillars in place, the scaling problem persists. During the OECD launch event, speakers widely acknowledged the “challenges that we’re all facing in actually scaling AI projects… from a pilot to large-scale change.” The core issue is that standard evaluations are fundamentally flawed for complex digital transformation. Traditional evaluations treat success as a binary on/off switch: Was the software deployed? Yes or No? Did the users log in? Yes or No? But human adoption, trust, and institutional change in complex environments—whether in a sprawling public agency or the Amazon basin—do not operate in binary terms.

    The Solution: A Realist Approach to Digital Transformation

    As the Spanish Minister emphasized at the OECD event, we must look deeply into specific use cases to understand successes and failures, reminding us that “this is AI for humans… and that’s also talking about transparency because that is a key issue now.” Relying on use cases makes sense because it provides insights into the unique contextual conditions of an application domain.

    To solve the scaling problem, a novel digital transformation evaluation framework has been developed by researchers from Reykjavik University alongside industry practitioners (Hjaltalin et al., forthcoming).

    This framework moves beyond asking “Did it work?” by adopting and adapting a Context + MechanismMechanism refers to a specific intervention introduced in a particular social program. For example, the police install CCTV cameras on streets with a high rate of burglary. The functioning of mechanism in a program is best understood through metaphors. One is that of a ‘trigger’: a pistol fires a bullet triggered by the ignition of gunpowder within the pistol’s barrel. Another is the ‘dimmer-switch’ metaphor: a dimmer-switch operates on a continuum, where at maximum the light is very bright and at minimum it is pitch black. My understanding aligns closer to the latter metaphor and is used as such in my research. = Outcome (CMO) realist evaluation approach:

    • Context (C): It examines the particular contextual conditions (e.g., governance structures, common standards, digital rights) that enable or constrain the initiative.
    • Mechanism (M): It assesses the human drivers—such as trust and behavioral shifts among civil servants or citizens.
    • Outcome (O): It evaluates to what extent the AI initiative actually produced public value outcomes under those particular circumstances.

    Moving from Binary to Continuum

    The true power of this framework is that it treats a particular mechanism as producing outcomes on a continuum, rather than a binary on/off switch.

    Take Brazil’s AI climate governance plan as an example. Instead of a standard evaluation that simply asks, “Do the environmental enforcement agents use the AI risk predictions? (Yes/No),” the CMO framework evaluates the mechanism of trust on a continuum.

    Perhaps the agents in a specific region are currently at “skeptical but experimenting,” which produces the outcome of “partial verification of AI data.” By mapping this continuum and identifying how specific contextual conditions constrain these mechanisms, policymakers don’t just see a “failed” pilot. They see exactly where the human friction is. They can then intervene—perhaps through targeted training or greater stakeholder engagement—moving the mechanism further along the continuum toward active reliance and co-creation.

    Bridging the Gap Between Pilot and Public Value

    Deploying technology is only ten percent of the battle. An incredibly sophisticated AI model that environmental agents ignore on the ground produces zero real-world value.

    To overcome the scaling problem, governments and enterprises need to stop treating digital transformation as a simple IT deployment. Leaders must adopt analytical guardrails that measure context, mechanism, and outcomes to ensure that when an AI initiative scales, it genuinely empowers users and delivers measurable public value.

    How Stirna Consulting Can Help

    At Stirna Consulting, we understand that AI implementation is deeply sociotechnical. Led by our CEO and lead analyst, Hjaltalin—co-author of the forthcoming realist evaluation framework mentioned above—we don’t just help build systems. We provide the proprietary analytical methodologies and cross-functional change management necessary to ensure your digital transformation doesn’t stall at the pilot phase.
    Whether you are deploying enterprise CRM software or navigating complex public sector IT programs, we ensure your technology empowers your team rather than dictating to them. Reach out to Stirna Consulting today for practical advice on digital transformation and clear next steps.

    Sources

    Hjaltalin, I. T., Candi, M., Sigurðarson, H. Th. (2026). Agile Governance in Public Sector Digital Transformation: a Program Evaluation [Manuscript submitted for publication]. Department of Business and Economics, Reykjavik University.

    Hjaltalin, I. T., Bjartmarz, Th. (2026). Artificial Intelligence in Environmental Governance: Reconfiguring Public Value, Legitimacy, and Operational Capacity in EU Multi-Level Networks [Manuscript in preparation]. Department of Strategy & Innovation, Copenhagen Business School.

  • Dynamics 365 CRM Solutions

    Dynamics 365 CRM Solutions

    A comprehensive guide to Microsoft Dynamics 365 Sales and Customer Service.

    What are the Different CRM Products and How Do They Differ?

    Dynamics 365 Sales

    Designed for sales teams to manage the entire sales lifecycle. It helps teams track leads, manage opportunities, forecast revenue, and close deals. Perfect for real estate agents managing property listings and sales pipelines.

    Best for: Sales teams, lead management, pipeline forecasting, deal tracking

    Dynamics 365 Customer Service

    Focused on customer support and service delivery. It enables teams to manage customer inquiries, track cases, maintain knowledge bases, and provide omni-channel support. Ideal for property management inquiries and after-sales service.

    Best for: Support teams, case management, service delivery, customer inquiries

    Key difference: Sales focuses on acquiring customers and closing deals, while Customer Service focuses on supporting customers throughout their journey and managing inquiries. For a comprehensive CRM, both modules work together seamlessly.

    What are the Specific Features of Each Product License?

    Each product (Sales and Customer Service) is available in two licensing tiers: Professional and Enterprise. The tier you choose determines which features are available to your team.

    Dynamics 365 Sales

    Professional:

    • Lead and opportunity management
    • Account and contact records
    • Product catalog and price lists
    • Quote and order management
    • Basic forecasting
    • Outlook and Teams integration
    • Mobile app access
    • Standard analytics and reports

    Enterprise (All Professional features, plus):

    • Advanced forecasting and revenue analytics
    • Territory management
    • Goal management and tracking
    • Enhanced customization (custom tables and processes)
    • AI-powered insights (Copilot, predictive scoring)
    • Advanced workflow automation
    • Broader Dataverse storage entitlements
    • Advanced reporting and analytics

    Dynamics 365 Customer Service

    Professional:

    • Case and ticket management
    • Customer knowledge base
    • Basic queue management
    • Self-service portal capabilities
    • Email and chat integration
    • Mobile case management
    • Standard analytics for agents
    • Basic SLA tracking

    Enterprise (All Professional features, plus):

    • Intelligent routing and skills-based assignment
    • Advanced SLA management
    • Resource scheduling and optimization
    • Omni-channel support unified across channels
    • Advanced automation (Power Automate integration)
    • Deeper analytics and dashboards
    • AI-powered insights and recommendations
    • Integration with other Dynamics 365 apps

    Integration and Productivity Tools (All Tiers):

    • Outlook Integration – Track emails, appointments, and tasks directly in Dynamics 365
    • Teams Integration – Access records and take actions without leaving Teams
    • Power Automate – Automate workflows, notifications, and task creation
    • Power BI – Create custom analytics and dashboards (Enterprise tiers enhanced)
    • Mobile Apps – Full access to records and functionality on smartphones and tablets
    • Portal Capabilities – Allow customers to self-serve without direct agent contact

    How is Pricing Structured?

    Microsoft Dynamics 365 uses a per-user, per-month subscription model. This means you pay for each named user who needs access, and billing is based on the license tier they use. There are no fixed-price options from Microsoft, though implementation services are billed separately.

    Current Pricing Structure (indicative USD monthly rates for 2025):

    User License Costs (Monthly per User):

    • Sales Professional: $65/user/month
    • Sales Enterprise: $95/user/month
    • Customer Service Professional: $50/user/month
    • Customer Service Enterprise: $95-105/user/month

    Example: 20-25 User Organization

    For a small-to-medium organization with 20-25 total users across Sales and Customer Service, a typical mix might look like:

    • Sales Professional (15 users): $65 × 15 = $975/month
    • Sales Enterprise (3 users): $95 × 3 = $285/month
    • Service Professional (5 users): $50 × 5 = $250/month
    • Service Enterprise (2 users): $100 × 2 = $200/month

    Total Monthly Subscription Cost: $1,710

    Implementation Services (Separate from Licensing)

    In addition to monthly user licenses, implementation and consulting services are billed separately. Stirna Consulting offers implementation, configuration, training, and support at €105/hour for CRM consulting, configuration, implementation, and training.

    Key Pricing Points:

    • Per-User Billing: You only pay for users who need access
    • Flexible Mix: Combine Professional and Enterprise licenses as needed
    • Scalability: Add or remove users as your team grows or changes
    • Discounts Available: Microsoft often provides discounts for multi-year commitments or bulk licensing
    • No Lock-in: Monthly billing with flexibility to adjust at renewal
    • Implementation Separate: Consulting and setup costs are additional and customized to your scope

    Comparing Models:

    Unlike some CRM systems with fixed-price plans, Dynamics 365’s per-user model means:

    • Transparent: You know exactly what you’re paying for
    • Scalable: Grow your system without major price jumps
    • Flexible: Pay only for the users and features you need
    • Enterprise-Grade: Access to Microsoft’s full support and updates

    Ready to Implement Dynamics 365 for Your Organization?

    Stirna Consulting specializes in designing lean, real estate-focused CRM implementations. We can help you assess fit, plan your phased rollout, and train your team—all at a fixed rate of €105/hour.

    Contact us at contact@stirna.is for a free consultation on Dynamics 365 CRM implementation.

  • ChatGPT and Microsoft

    ChatGPT and Microsoft

    Earlier this year (Jan 2023), Microsoft announced its partnership with OpenAI concerning artificial intelligence (AI) development in the coming years. This announcement was particularly interesting because, just a few weeks earlier, OpenAI released ChatGPT3, which caught the world by surprise, to say the least. So what does this mean for Microsoft users, in particular those using its business applications?

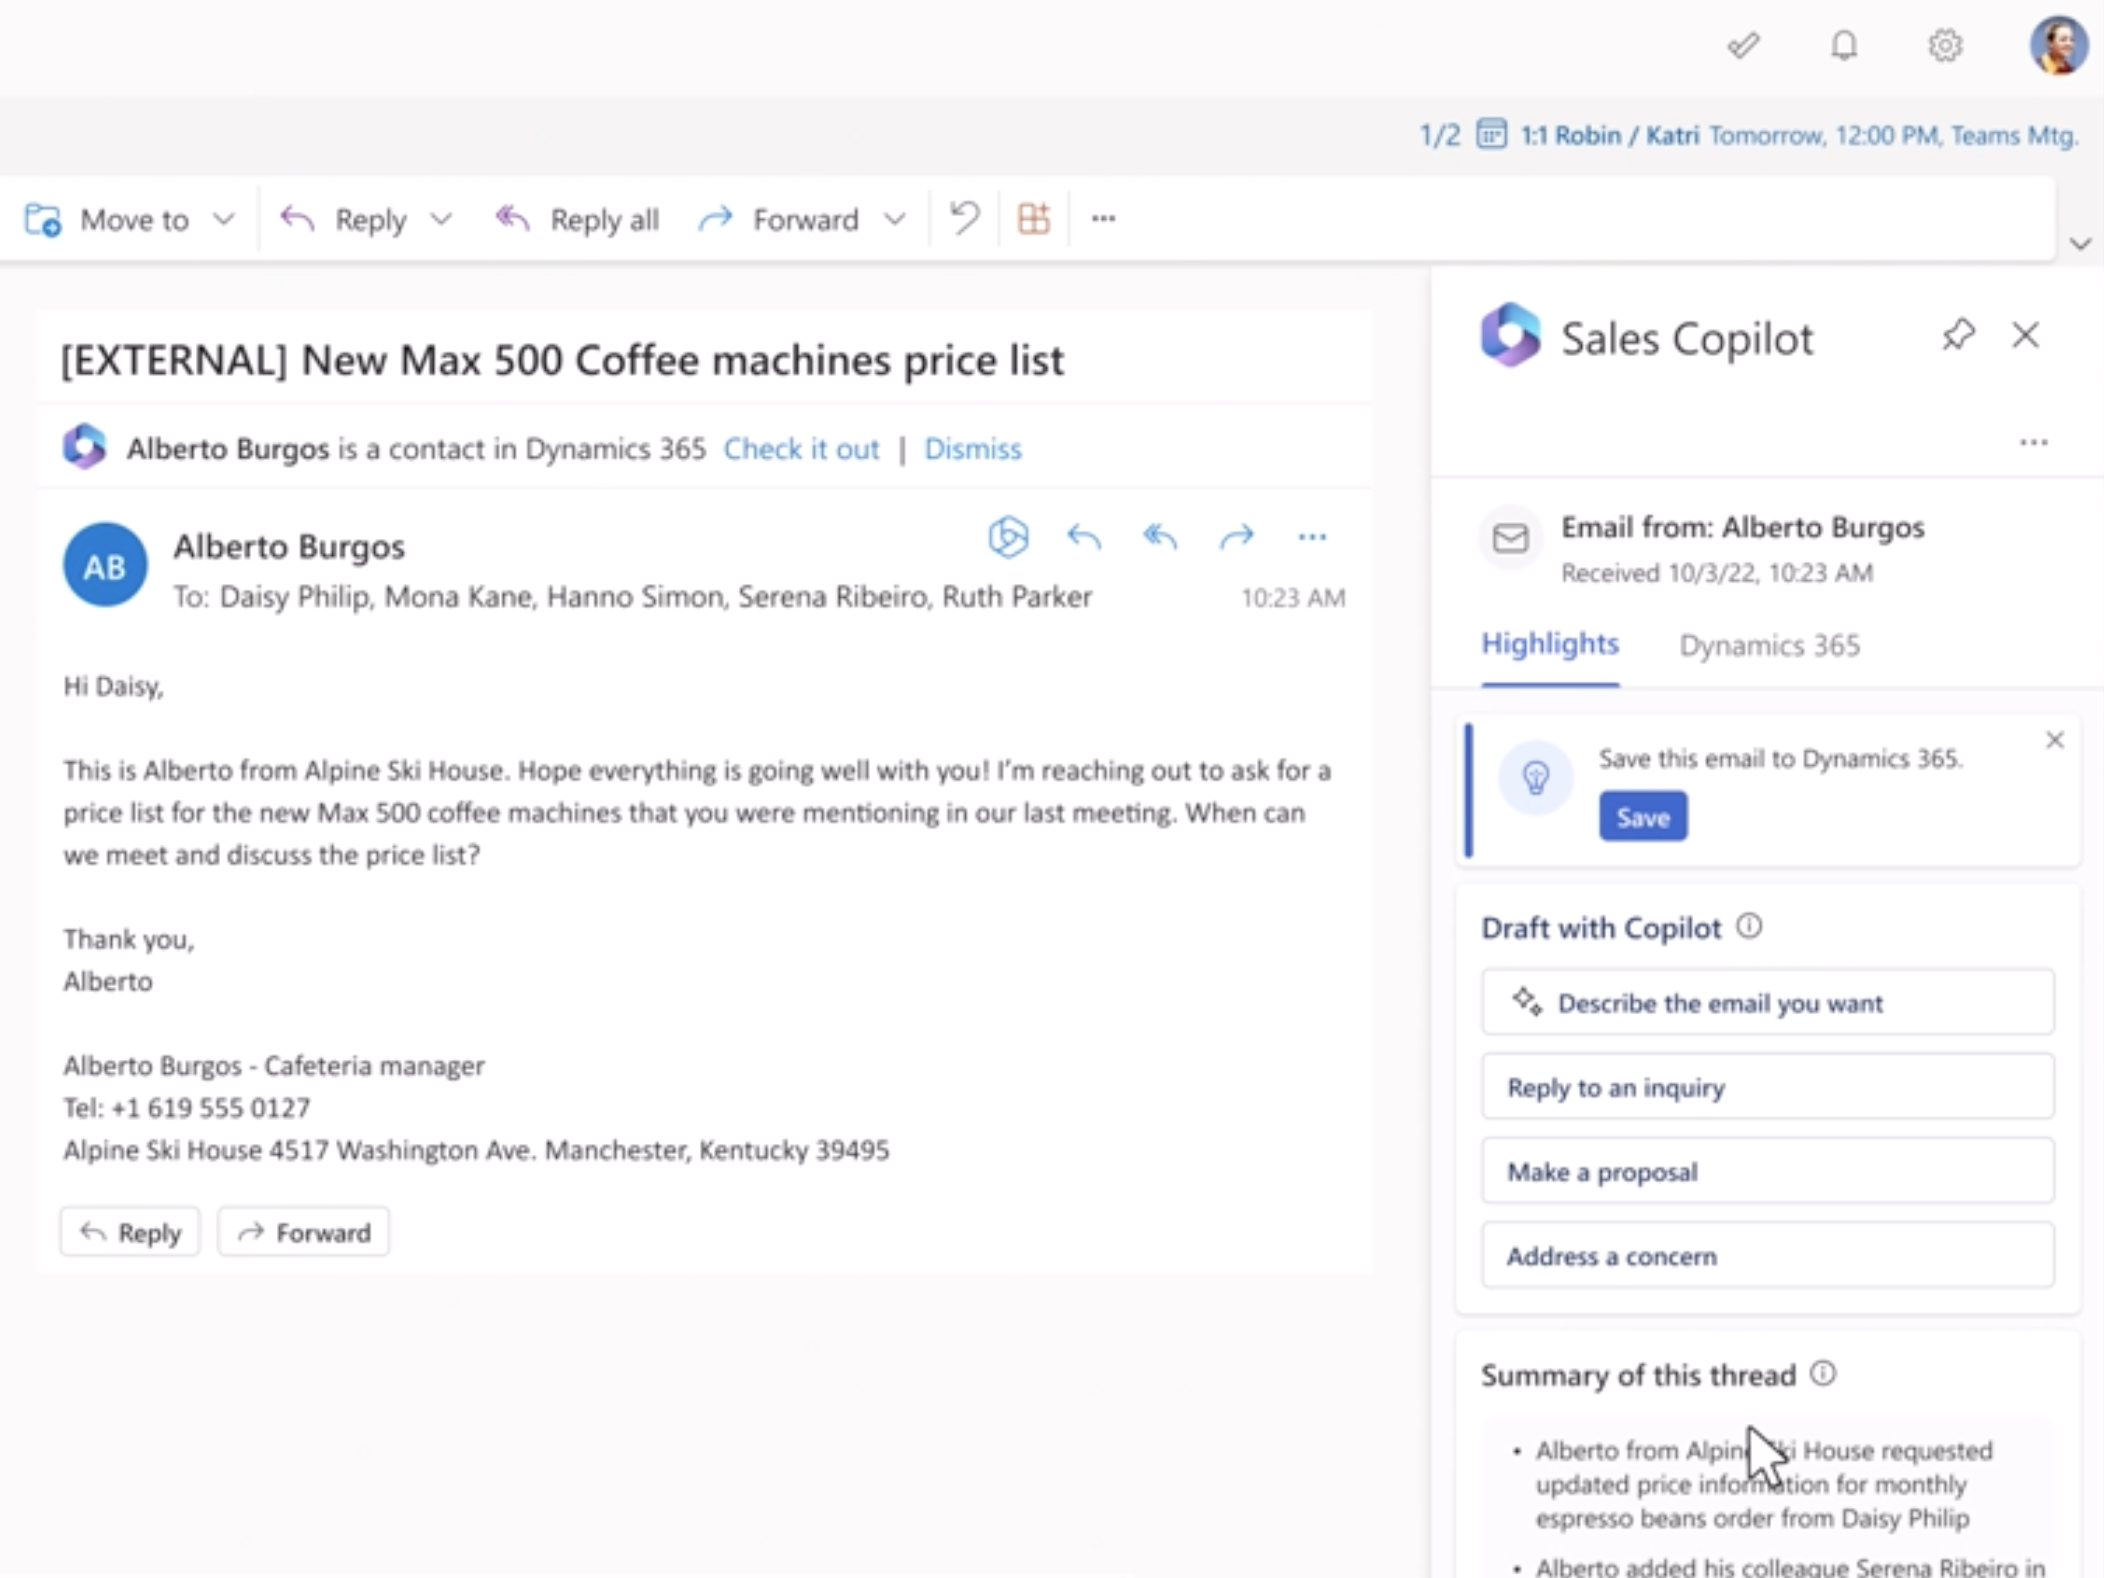
    To answer this question, I researched one new product, Sales Copilot, and tested it (see below). It is an add-on to Outlook that integrates CRM data with Outlook emails using AI. This seems appropriate as Outlook is the app many people use to talk with colleagues and partners. ChatGPT (the underlying technology) is precisely that, i.e., an interface used to chat with AI to solve problems or find solutions to questions. Imagine an AI agent that is always available in case we have questions or need answers to work-related issues. Wouldn’t that be something?!

    Before we get too excited, GhatGPT, and other systems based on similar technology, are still in their infancy. These systems are not yet mature enough to have a serious transformational impact on our daily work. Nevertheless, the impact has been large in terms of people’s increased interest in AI, which, generally, I think is a good thing. This interest will drive further investments into AI research and development.

    Anyway, turning to the topic at hand. In the announcement mentioned above, Microsoft said: “we will deploy OpenAI’s models across our consumer and enterprise products and introduce new categories of digital experiences built on OpenAI’s technology.” Moreover, it talks about how Microsoft has supplied the company with the IT infrastructure needed to develop its products, including ChatGPT and other solutions. However, Microsoft didn’t reveal much about its intentions to use these solutions until months later when it announced Microsoft Sales Copilot (previously Viva Sales).

    The Sales Copilot is an AI application that enables sales teams to better access relevant client information to help them close more deals.

    Sales Copilot in Outlook

    Sales Copilot can show you highlights from email conversations with clients or prospects, which you can use to perform various tasks, e.g., create a reply, save information to the CRM (Salesforce or Dynamics 365).

    If you would like to test the AI, it’s easy to add it to Teams and/or Outlook. Let me know in the comments what you think.

  • Sending HTML emails through Dynamics 365

    Sending HTML emails through Dynamics 365

    Task: Send HTML email though Dynamics 365
    Difficulty: Advanced
    Time to implement: 1-2 hours

    Check out this video

    Tracking emails is a popular feature in Dynamics 365 Customer Engagement. You can track emails by connecting your mailbox with Microsoft Exchange and either use the Dynamics 365 app for Outlook or Dynamics 365 email capabilities to send out emails. Companies see great value in this feature because it allows them to have a CRM system in place where relevant interactions between a customer and an organization can be observed.

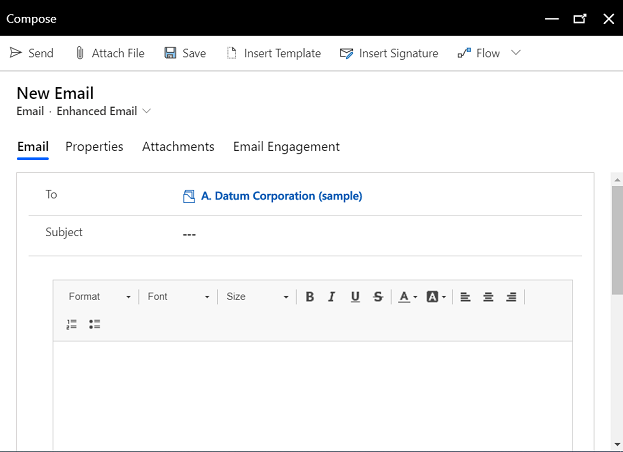
    In this post, I am going to show you how to use the Dynamics 365 emails and discuss some of its benefits and limitations in terms of functionality. Dynamics 365 emails are equipped with a simple email editor for creating emails. The editor covers the basic requirements for what you would normally use when sending an email from your email client such as Gmail or Outlook.

    Email editing experience in Dynamics 365

    Dynamics 365 emails allow you to send emails to multiple recipients, add attachments, insert links and images. However, if you want to create your own HTML email you cannot do that through Dynamics 365 emails. This could be useful in scenarios where the company wants to send out a promotional emails, e.g. because there is a new product release or an event. Dynamics 365 does not support HTML emails.

    On the other hand, if you like to send HTML emails through Dynamics 365 there is a workaround. By leveraging Power Automate and the Dataflex (CDS Current enviornment) connector, you can create a workflow that creates and sends an email with HTML content.

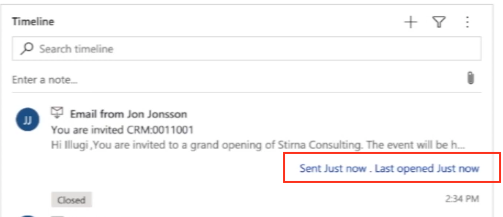
    For example, you have a lead that you would like to send an event invite to. You can achieve this by creating a flow in Power Automate and use a field on the lead to trigger the flow. The salesperson could simply check a box on the lead form to send the invitation. Furthermore, the email would be automatically tracked in Dynamics 365. This gives the salesperson and her manager a better overview of who has received an invitation to an event.

    In the remainder of this post I will show how you can create and send a HTML email through Dynamics 365 Sales with the help of Power Automate.

    1. Create the flow

    1. You start by navigating to make.powerapps.com and create a solution for your Flow. For information on how to create a solution in Power Apps please refer to this article.
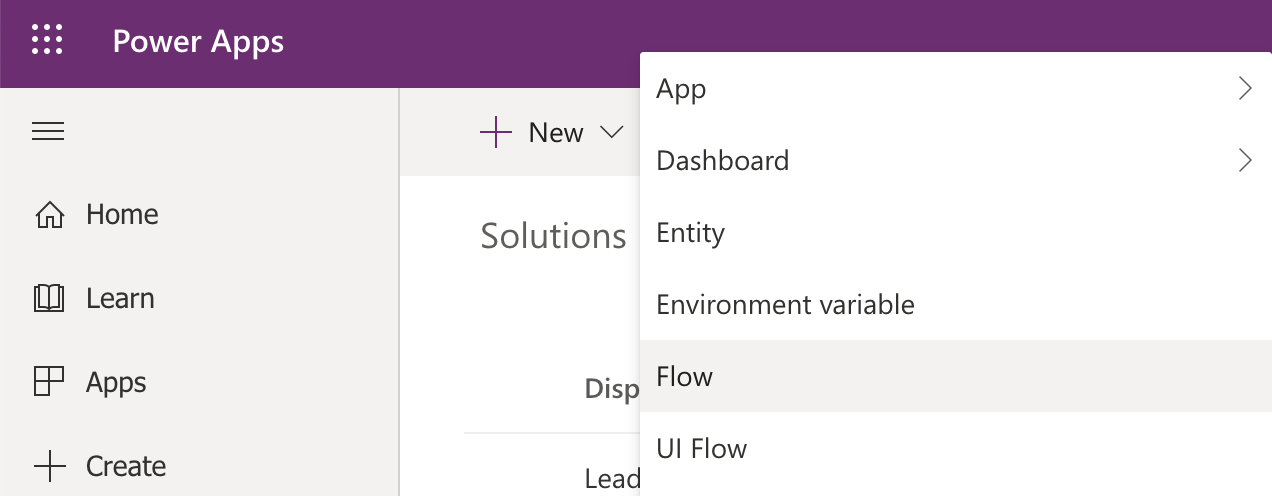
    2. Click on the ‘+New’ button and select Flow
    Create a Flow from within a Power App solution
    Create a Flow from within a Power App solution
    1. Search for and select the Dataflex ‘When a record is created, updated or deleted’ trigger (Common Data Service current).
    2. Give your Flow a name.

    2. Configure the flow

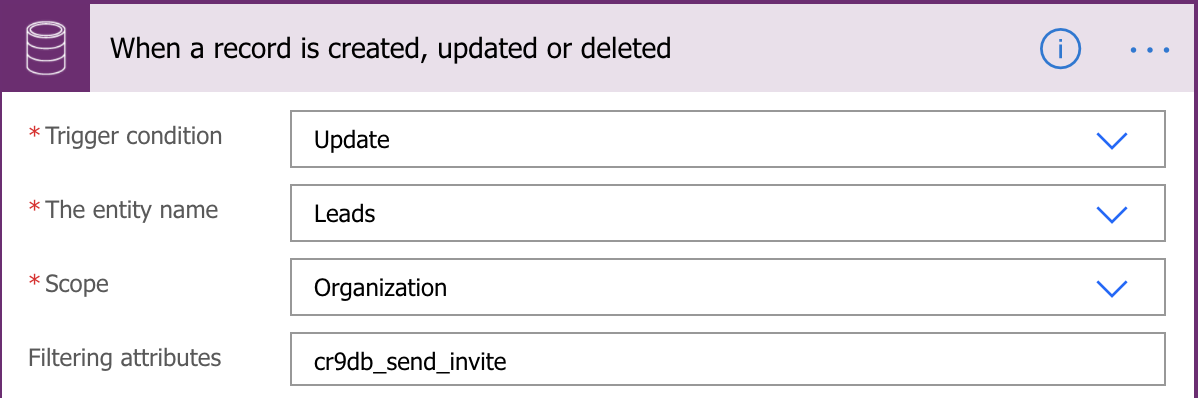
    Once you have created the flow you can define the entity name, the type of trigger condition as well as the filtering attribute for the newly created trigger. In this case we have created a custom field which will serve as the trigger for this flow or the filtering attribute.

    1. In trigger condition choose Update.
    2. In the entity name choose Leads.
    3. For the Scope select Organization.
    4. In the filtering attribute write the name of your custom field.
    Dataflex 'When a record is created, updated or deleted' trigger (Common Data Service current)
    The When a record is created, updated or deleted trigger (CDS current)

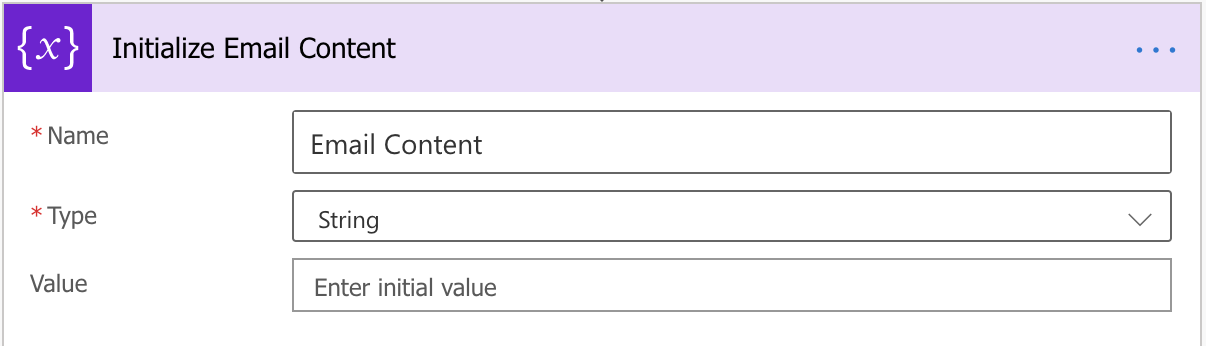
    Next we need a variable to store our HTML. To do this we:

    1. Click on the ‘New Step’ button.
    2. Select Initialize variable.
    3. Give our variable a name and choose type string. Leave the value field empty.
    Power Automate Initialize variable
    Initialize variable

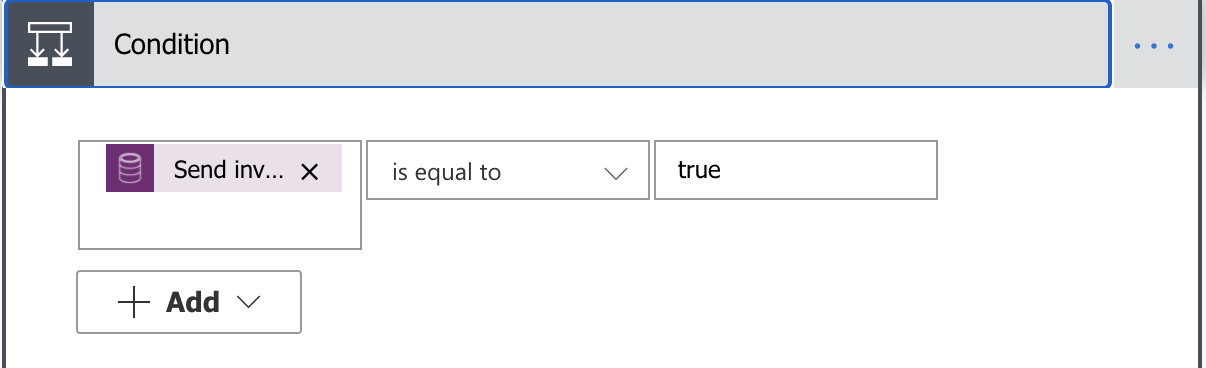
    Before we set the variable you first want to check if our field value meets the condition.

    1. Click on the ‘New Step’ button.
    2. Select control.
    3. Choose control condition.
    4. For the condition choose the custom field and that it should be equal to ‘true’. The field is a two option field which can be either true (1) or false (0).
    The condition should be that send invitation value is true.

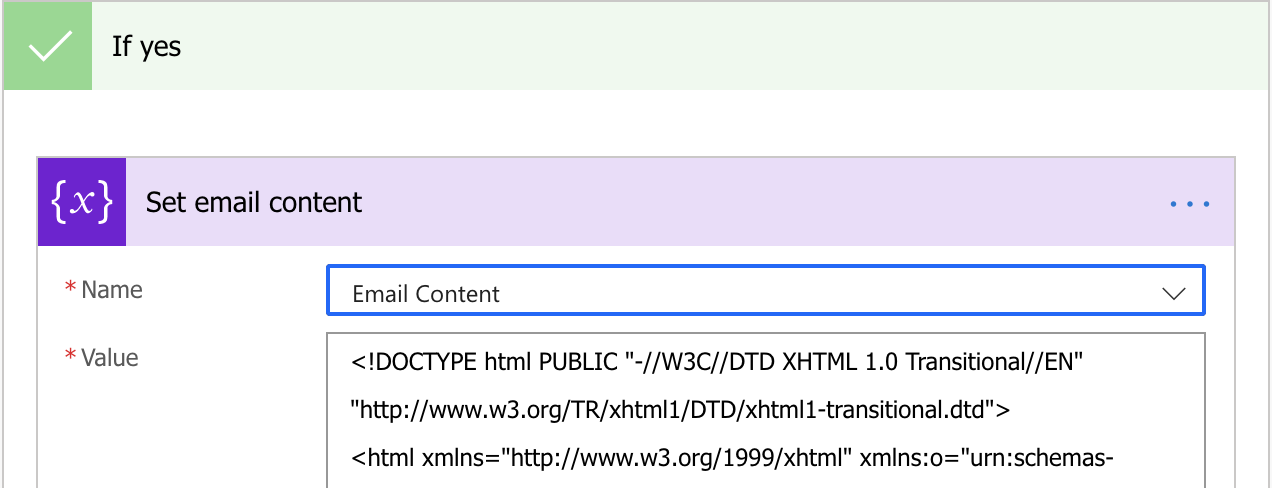
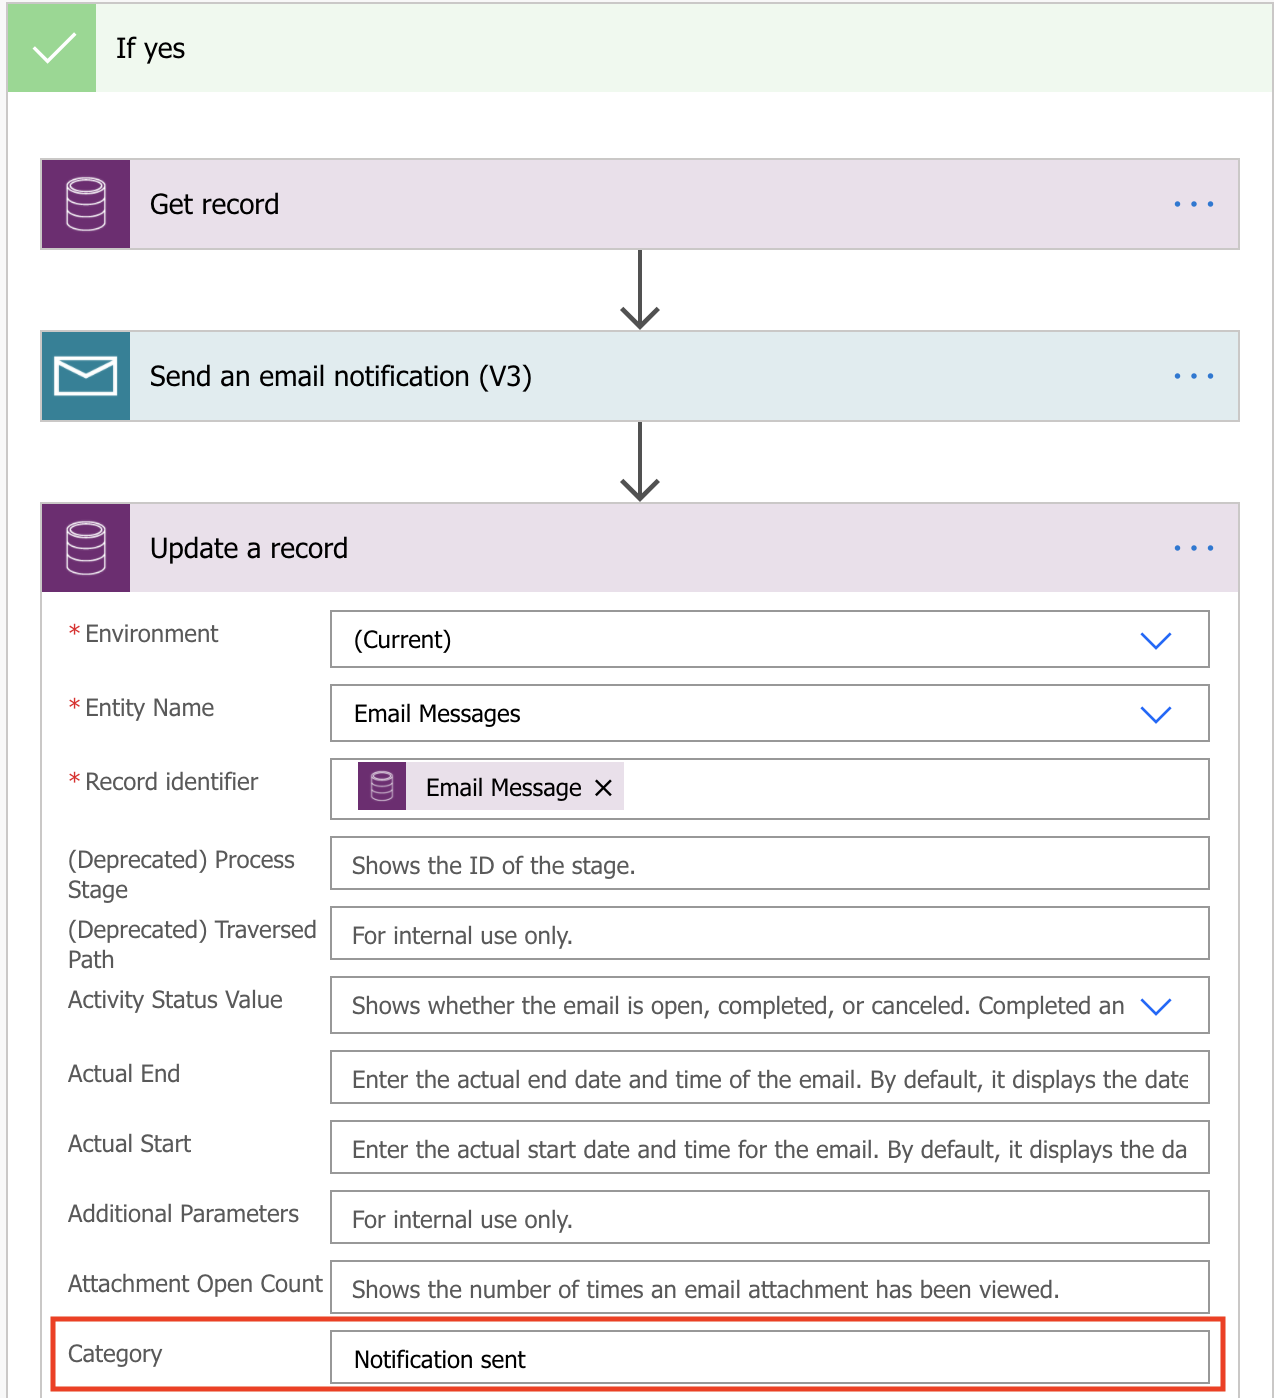
    When the condition is true you want the email to be sent. First you need to set the variable we created in our previous step and then you will create the email. Lastly you want to send the email message using a bound action.

    1. In the ‘If yes’ box click ‘Add an action’.
    2. Choose Set variable.
    3. In the name select the variable you initialized in steps 2.6-2.7.
    4. In the value field paste in your HTML code.
    Set variable and have it store the HTML code

    Now you have created the condition and set the variable. This leads to the creation of the email message. To create the message you:

    1. Below the ‘Set email content’ action click ‘Add an action’.
    2. Choose Create a new record – Dataflex (Common Data Service current).
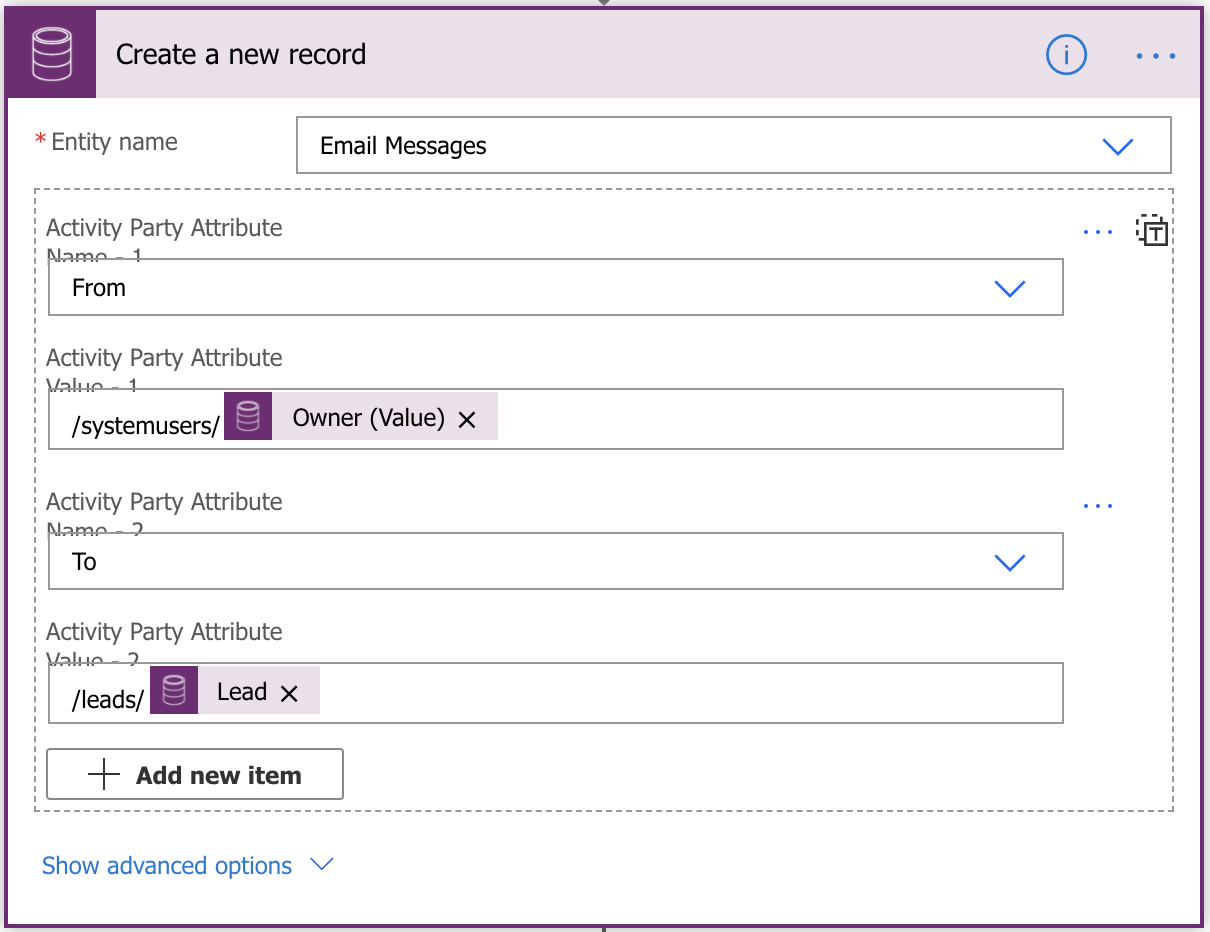
    3. For the email message choose the sender and receiver of the message. You must refer to the entity’s path as shown in the following screenshot. For more info about how this connector’s attributes are referenced see this article.
    How lookup fields are referenced in the create a new record current action
    How lookup fields are referenced in the create a new record current action
    1. Click ‘Show advanced options’ and add the email body to the ‘Description’ field, owner in the ‘Owner (Owners)’ field, the lead (‘/leads/{the lead GUID value}’) in the ‘Regarding (Leads)’ field, and the subject in the ‘Subject’ field.

    The final step is to send the email. This requires a special kind of action called a bound action. To see the difference between bound and unbound actions please refer to this article.

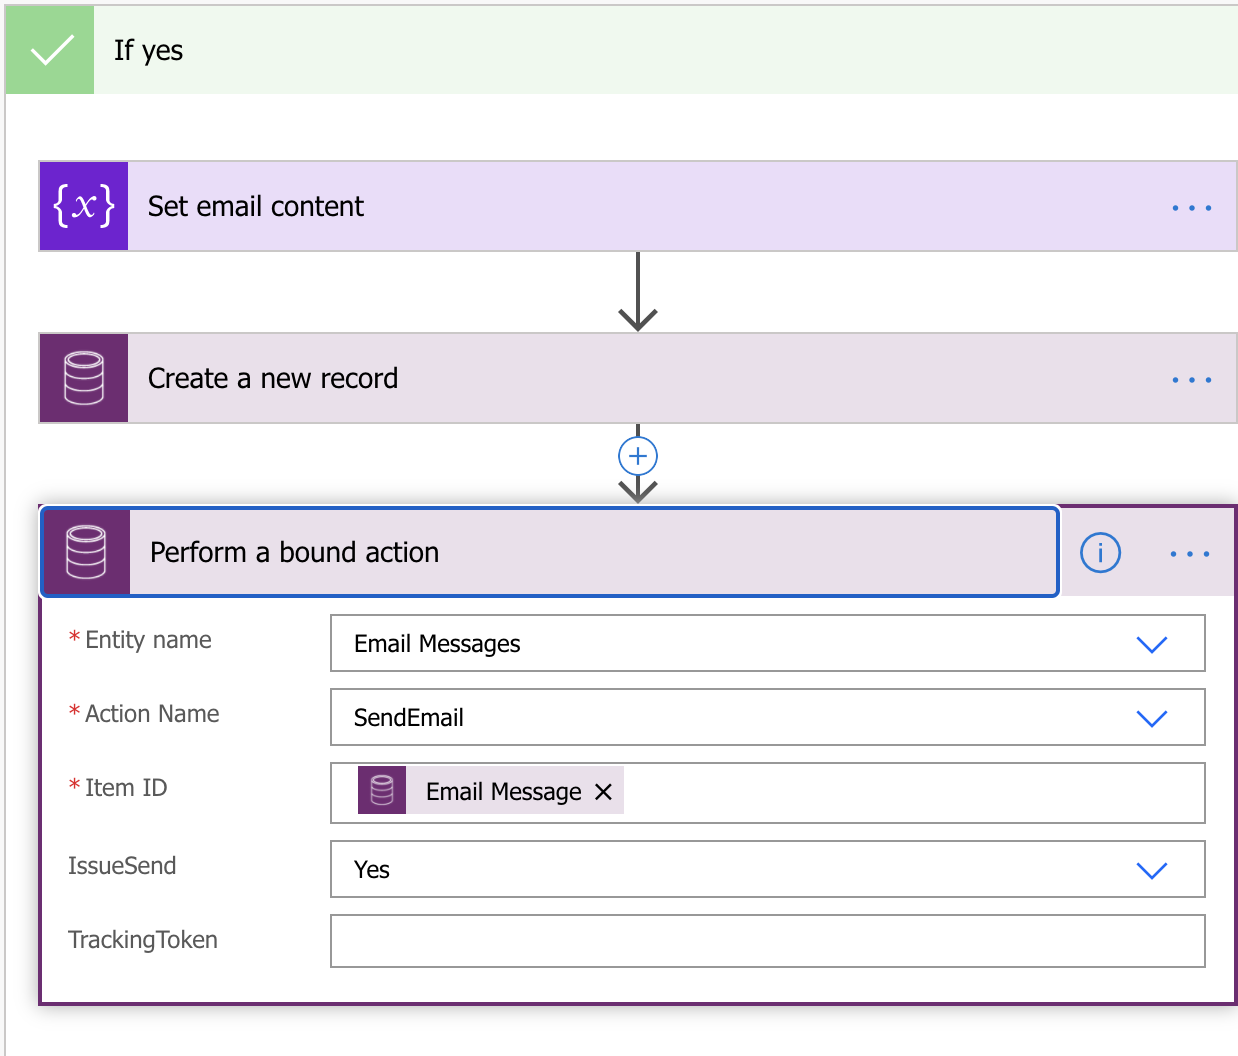
    1. Below the ‘Create a new record’ action click ‘Add an action’.
    2. Choose Perform a bound action – Dataflex (Common Data Service current).
    3. In the Entity name choose Email Messages
    4. For the Action Name choose SendEmail.
    5. In the Item ID insert the Email Message ID. You find the ID by using the dynamics content and choosing the unique ID of the email message you created in steps 2.16-2.19 above.
    6. In the IssueSend select Yes.
    Perform a bound action - Dataflex (CDS current) trigger
    Perform a bound action – Dataflex (CDS current) trigger

    3. Test the flow

    You can now test your flow to see if everything works as it should. Do a test run on a lead in your Dynamics 365 Sales to verify that the flow runs when the custom field is changed on the lead and if the email is sent when the flow condition is true. For more information about performing the test, please refer to the blog post’s video above.

  • Integrate your website with Dynamics 365 Sales

    Integrate your website with Dynamics 365 Sales

    Task: Integrate your website with Dynamics 365 Sales using Parserr parsing software
    Difficulty: Advanced
    Time to implement: 1-2 hours

    I am quite excited about sharing with you a great discovery I made when surfing the web looking for new ways to handle automatic record creation in Dynamics 365 from emails messages. In my research, I came across a parsing tool that enables you to create any record in Dynamics 365 based on form submissions and email messages.

    (more…)
  • Creating a Canvas App

    Creating a Canvas App

    Task: Create an app that allows employees to order food at the office canteen
    Difficulty level: intermediate
    Time to implement: 2-3 hours

    In this post, I will show you how to create an app that allows your employees to order food at the office canteen. Many offices order food from catering services. The catering service may or may not have an interface for employees to register or order food. In some occasions, the administrative staff has to collect the food orders and send it to the catering company. To make this process more efficient we will give our employees access to the app and allow them to choose between a couple of menus for a given week.

    By finishing the following steps, you will have a basic understanding how to create a Power App and can start to build your own custom apps tailored to your company’s needs.

    Table of contents

    Tools used for the app

    • Canvas apps
    • Common data service

    1. Creating the app

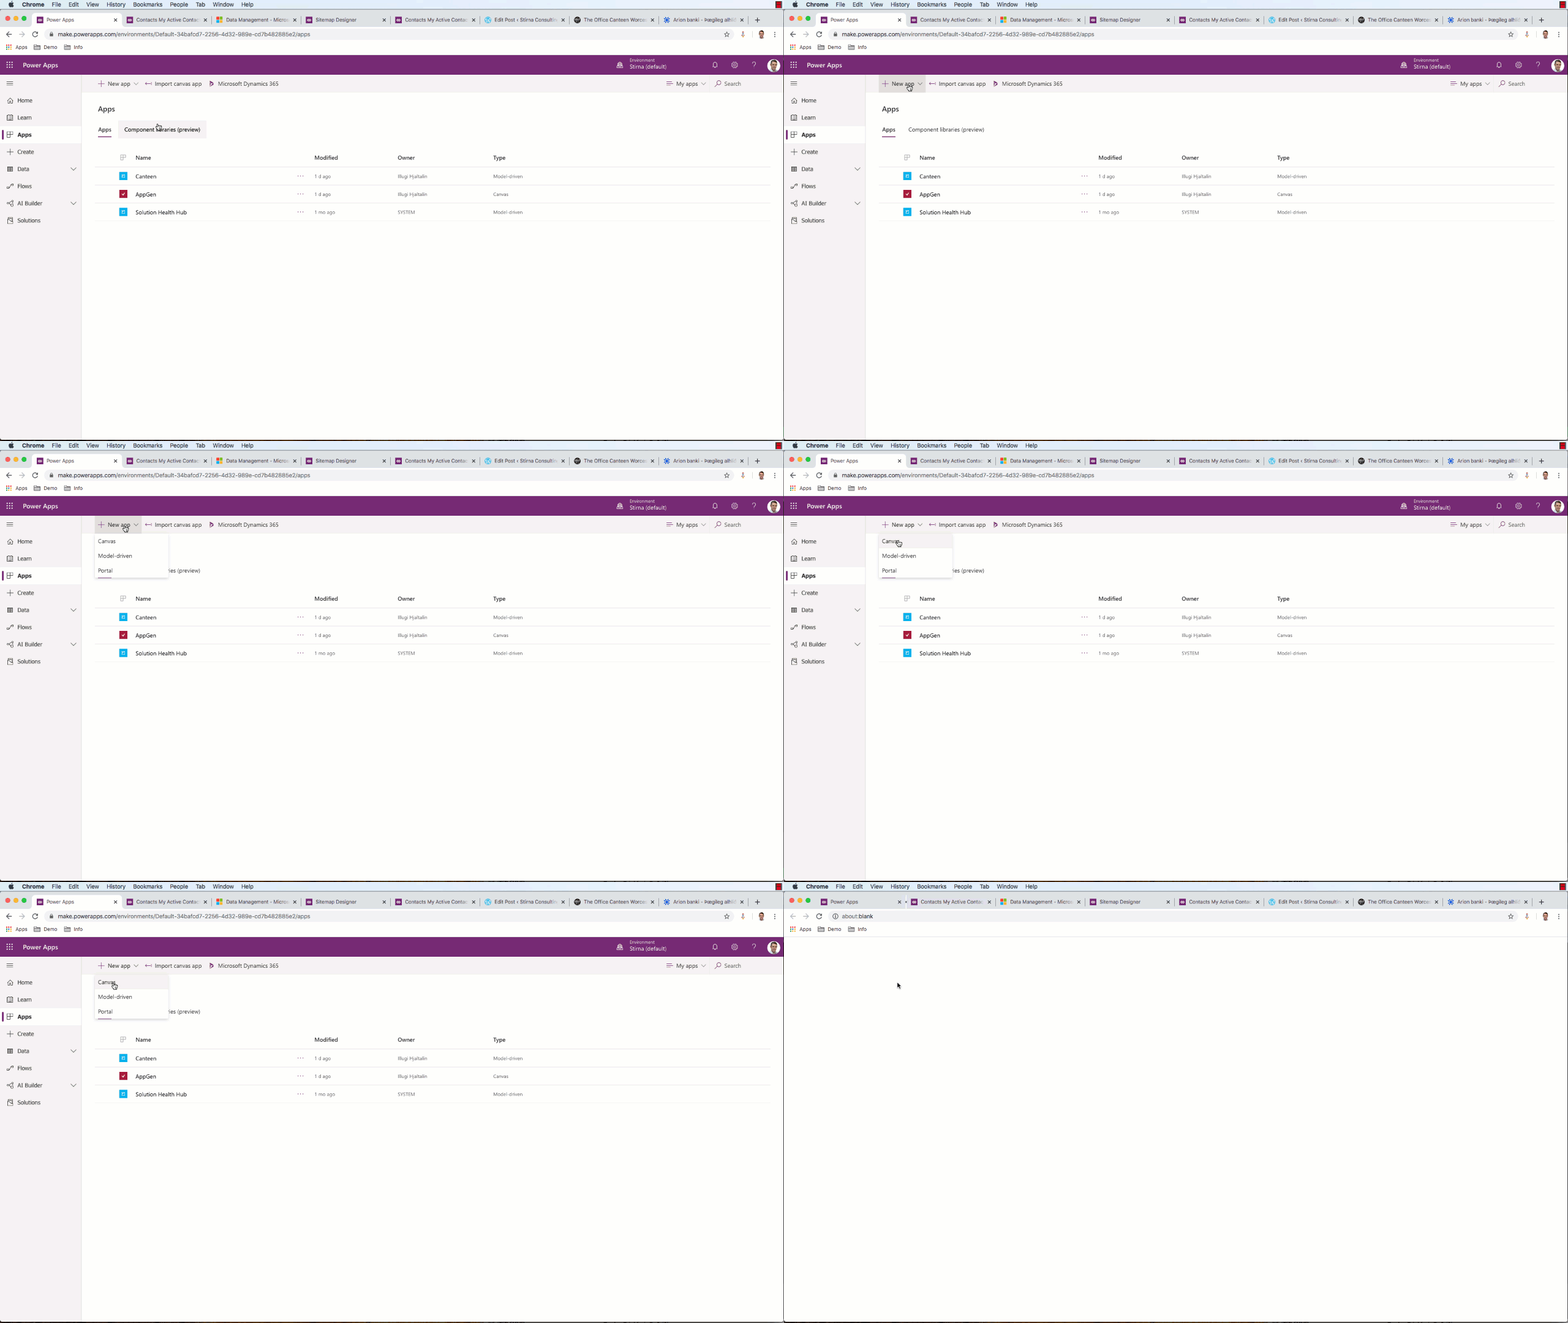
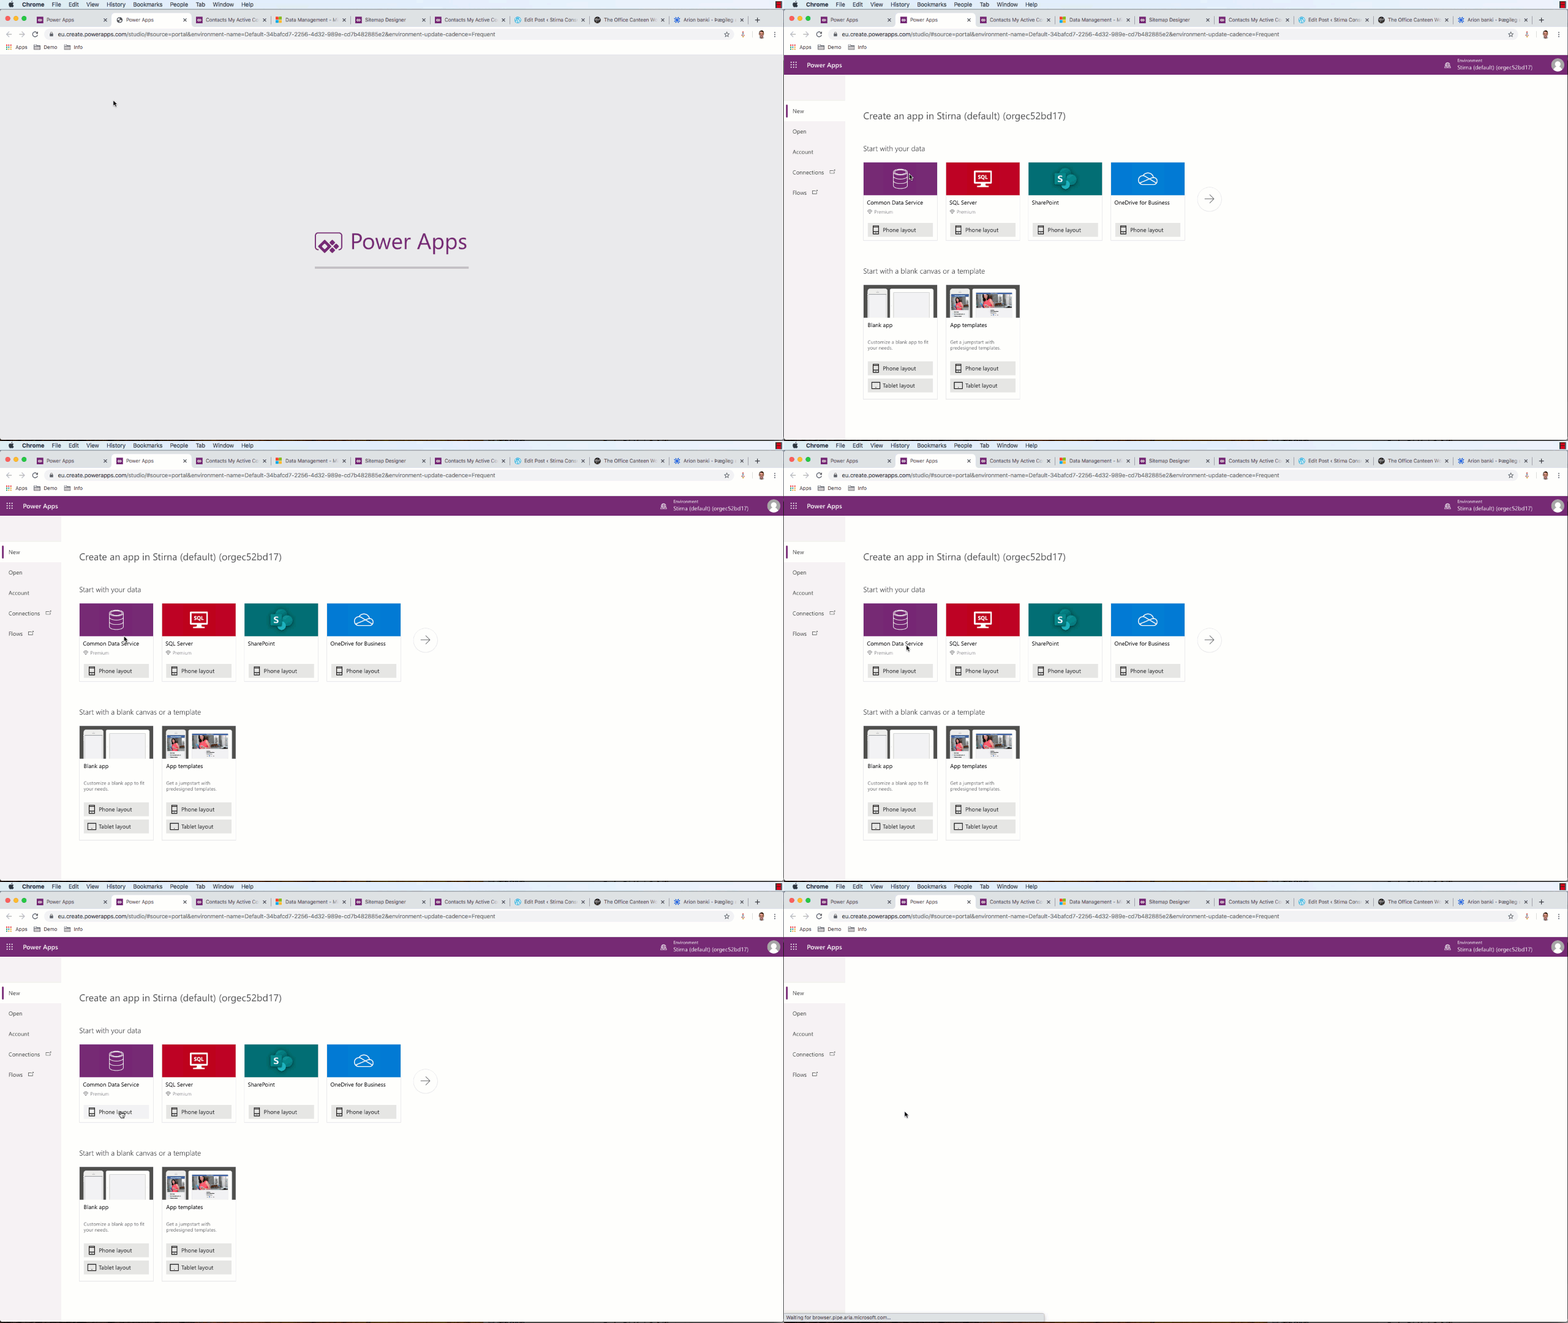
    1. Go to make.powerapps.com → Apps.
    2. Click New app → Canvas. This will take you to the create.powerapps.com where you will create your app.
    This image shows how to add a new canvas app in the Microsoft maker experience.
    Add a new canvas app
    1. We will be creating an app based on data in Common Data Service (CDS), so we will choose to create an app in our environment using CDS.
    2. Under Common Data Service, choose Phone layout.
    This image shows how to create a canvas mobile app from data in common data service.
    Choose a data source/layout
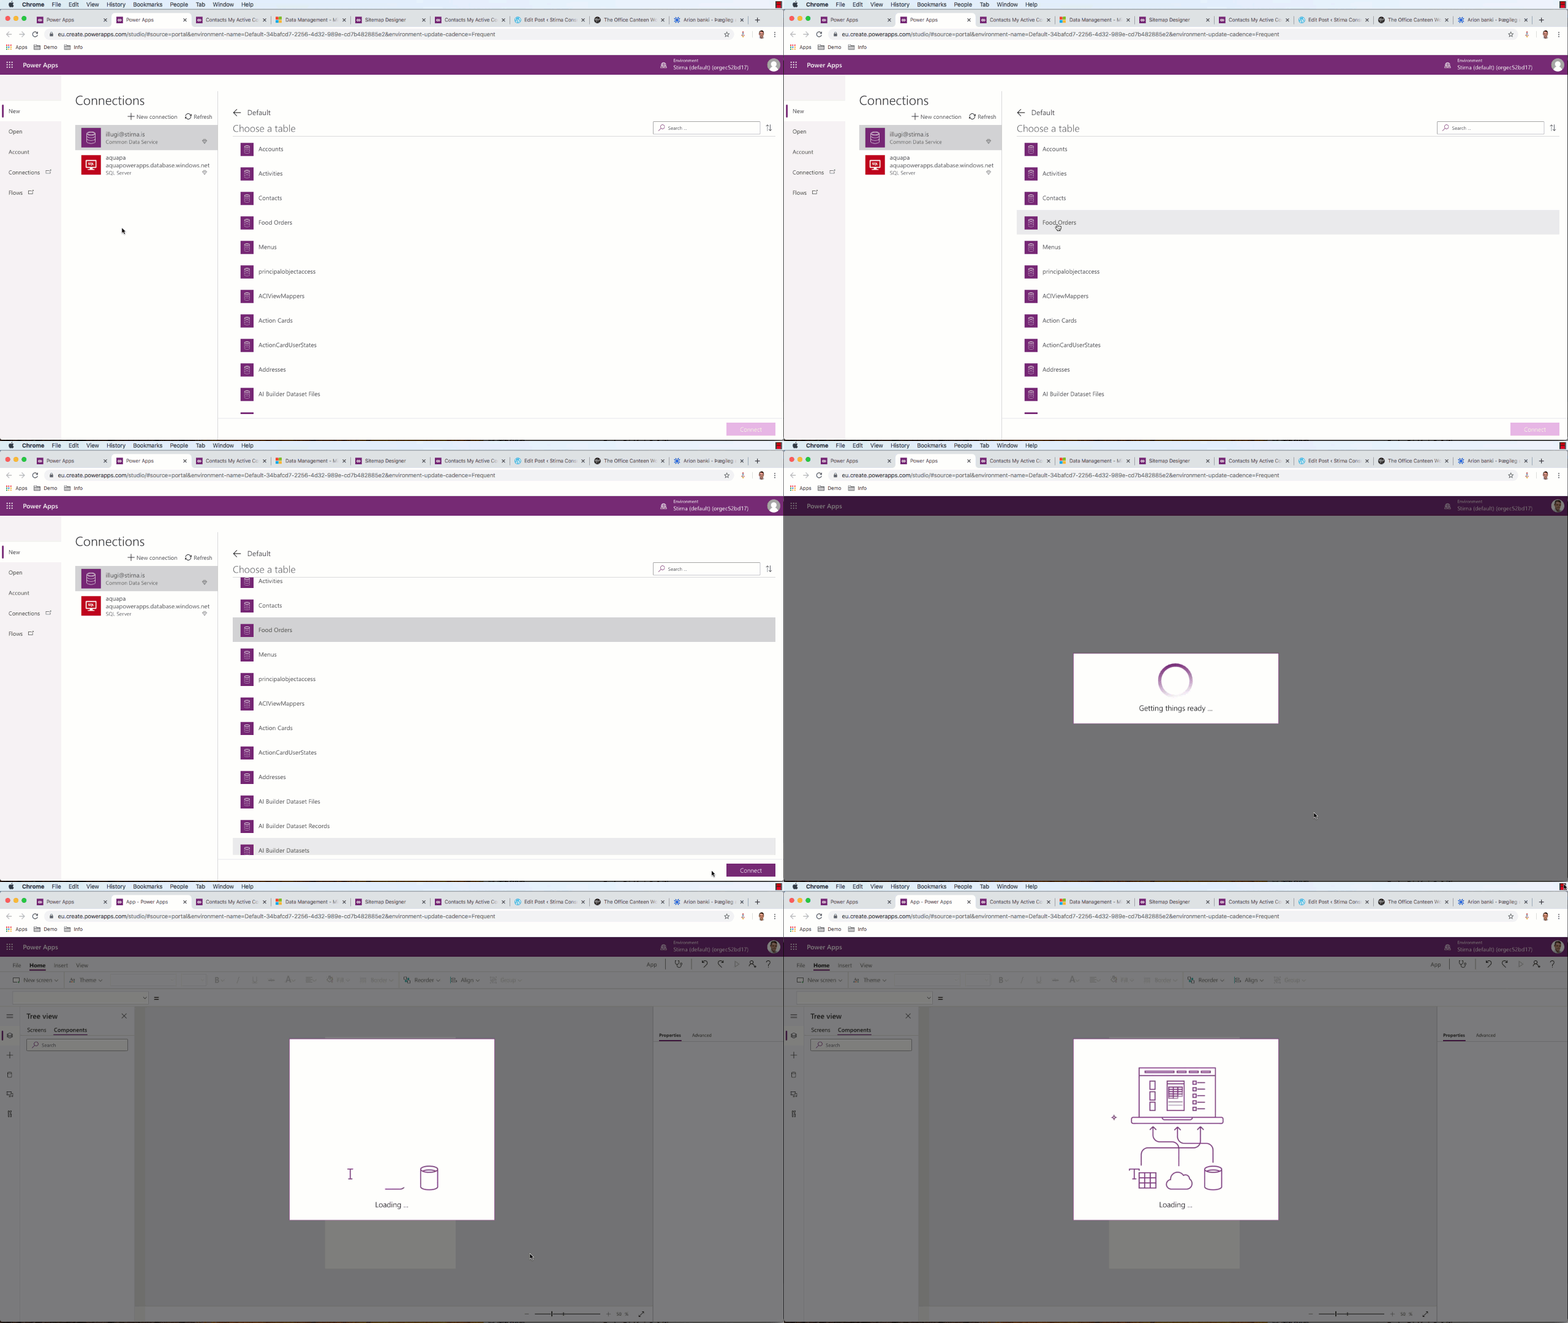
    1. A list of connections are presented. Under the Common Data Service connection, choose an entity. If you don’t have the connection you’ll have to create one. In this case, I have created a customer entity called Food Orders.
    This image shows how to create a canvas app from data in common data service.
    Choose a table/entity
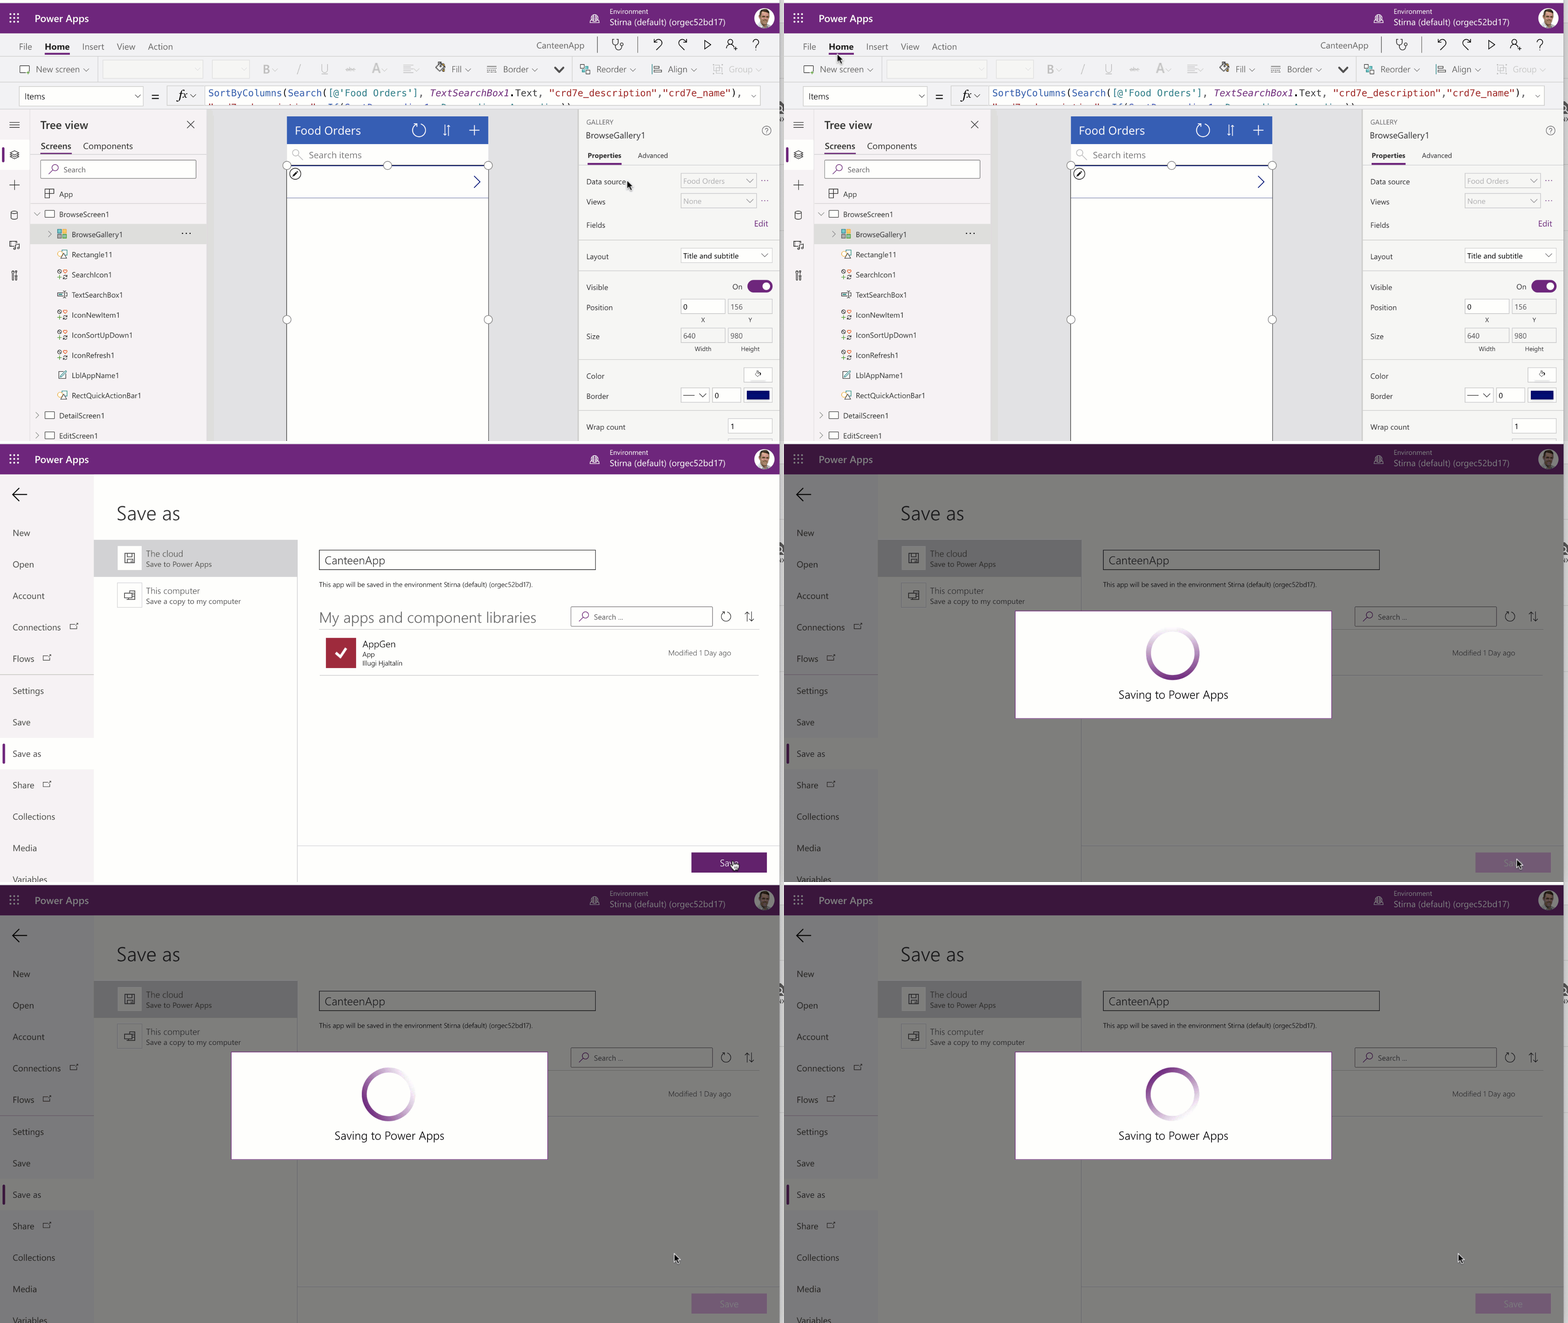
    1. Give your project a name by navigating to File → Settings and changing the name field. By default it is named App. I’ve named mine CanteenApp.
    2. Navigate to Save and click Save in the bottom right corner
    This image shows how to name a canvas app file and save it.
    Name and save your app

    2. Customize the app

    After you have created your app, you can start customizing the views and forms of your app. Similar to Dynamics 365, you edit the forms, e.g. rearrange fields and add/remove fields.

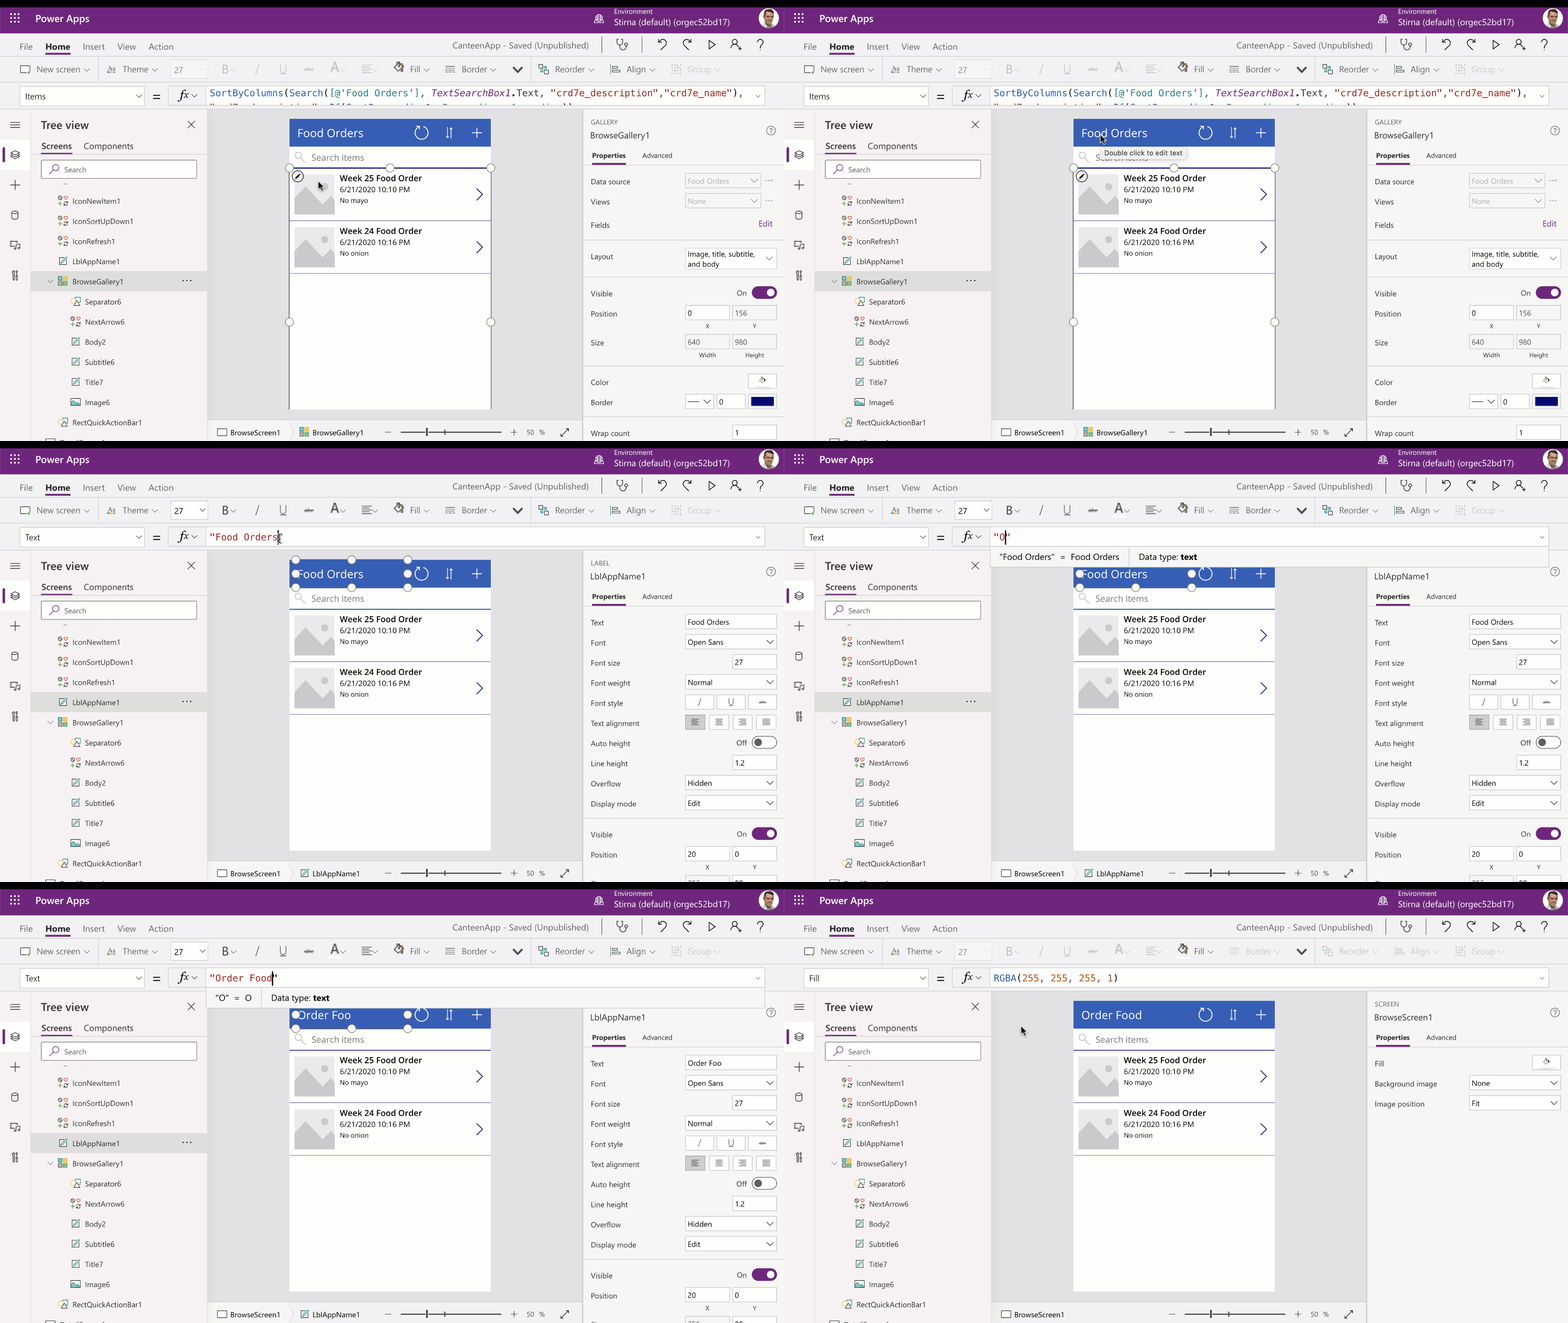
    First, I’ll start with the list view as I want to control how this screen appears to the user. I want the view to be called Order Food instead of Food Order because we want the user to perform an action in the system, i.e. order some food from the canteen. To do this you:

    1. Have BrowseGallery1 selected on the left navigation.
    2. Click on the name. It is by default named after the table/entity. I’ve named my app ‘Order Food’.
    This image shows how to rename a canvas app.
    Rename the app
    1. Next, navigate to BrowseGallery1 → Layout and select the layout you like. In this case I have chosen a layout with an image.
    2. After you have given your app a title and chosen the layout, you’ll want to save our app. Repeat step 1.7 to do this. In the next step you will change the details and edit views of your app.
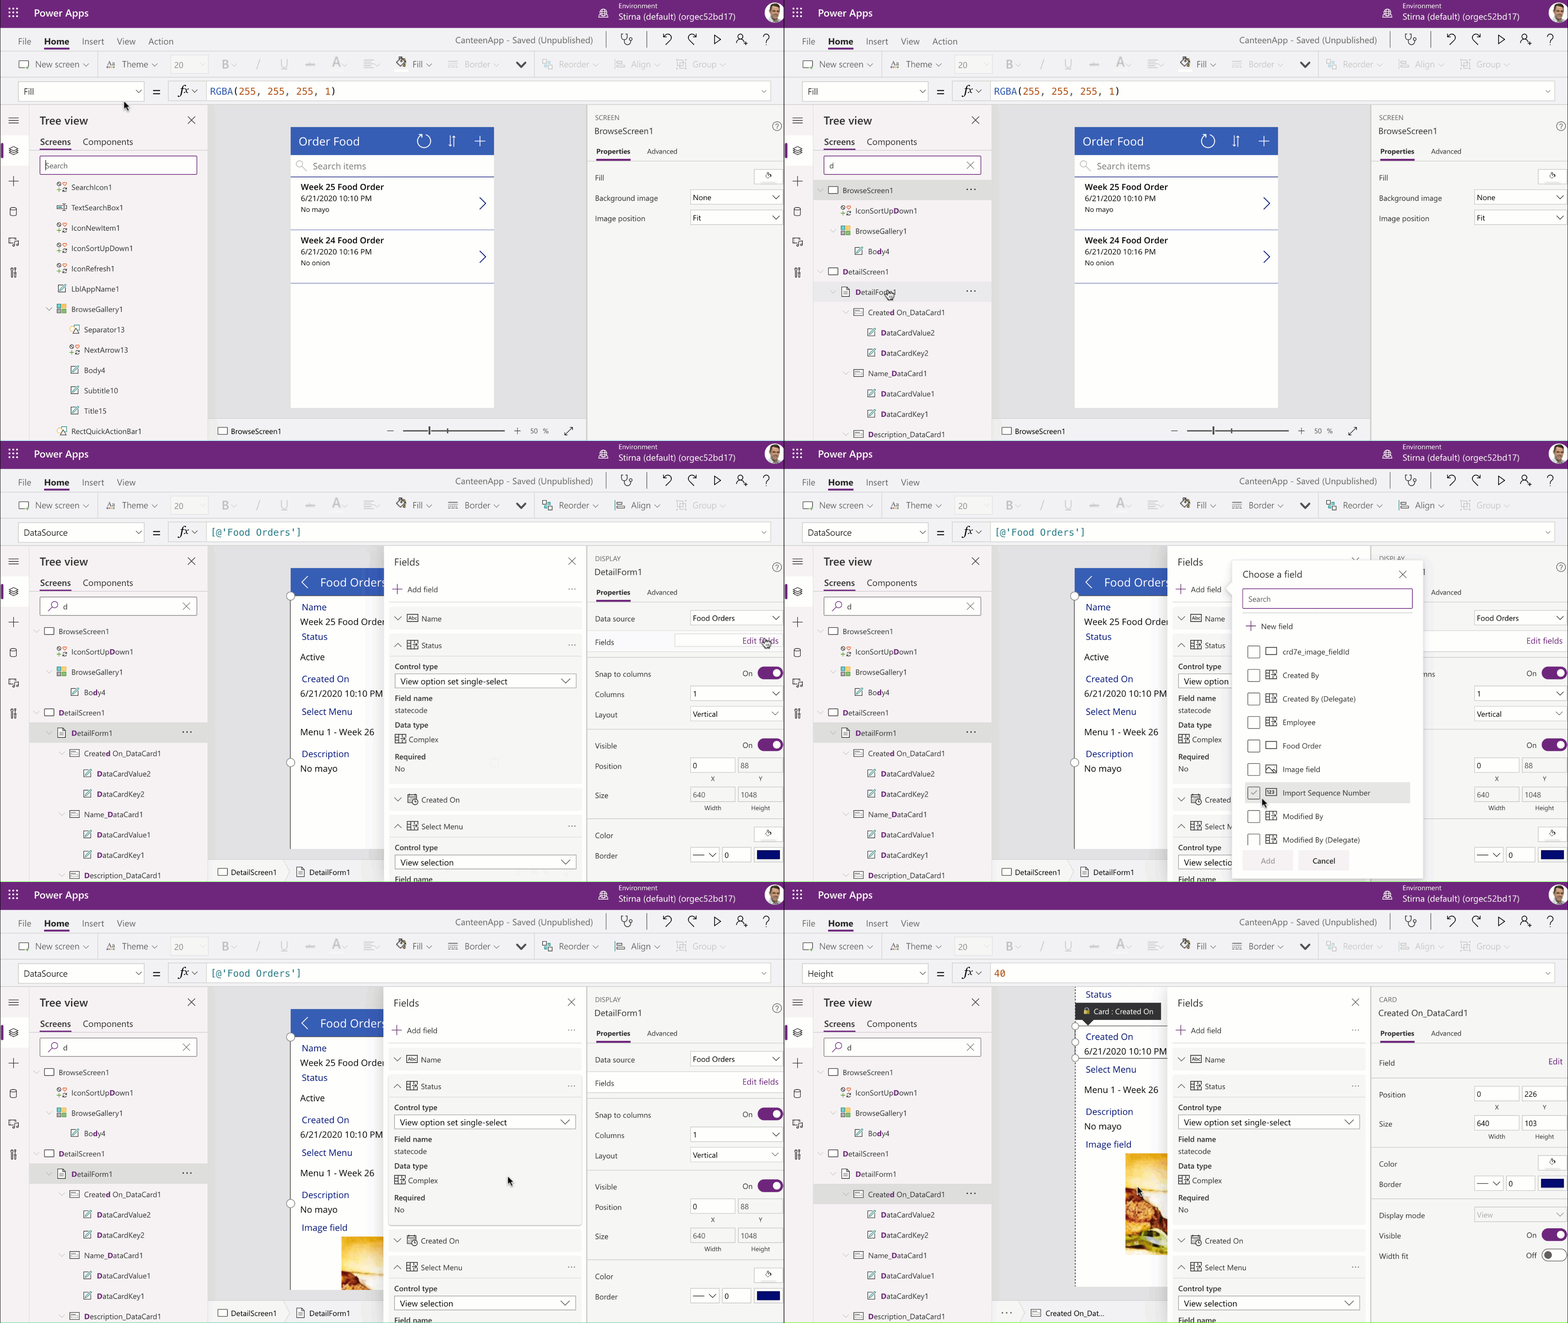
    3. In the Tree View menu navigate to → DetailForm1. You can do this by scrolling with your mouse or typing into the Search window.
    4. Under Properties navigate to → Fields and click on Edit Fields.
    5. Add the fields that you would like to see on the details view. This is the view the user sees when he clicks or taps on the Food Order item.
    This image shows how to edit fields on a canvas app form.
    Editing fields on a form
    1. Find the EditForm1 and Redo steps 2.5-2.7. Usually you want to display the same fields on an edit form as you do on a details form. This is expected behavior for a user. In the video at the end of this blog post, you can see how the app looks from the user’s perspective.

    3. Publish the app

    I assume that if you are like me, you want to polish the app to make it look a bit nicer. That’s fine. Once you are happy with how it looks (or perhaps you wan’t a colleague to test it for you), you can go ahead and publish the app.

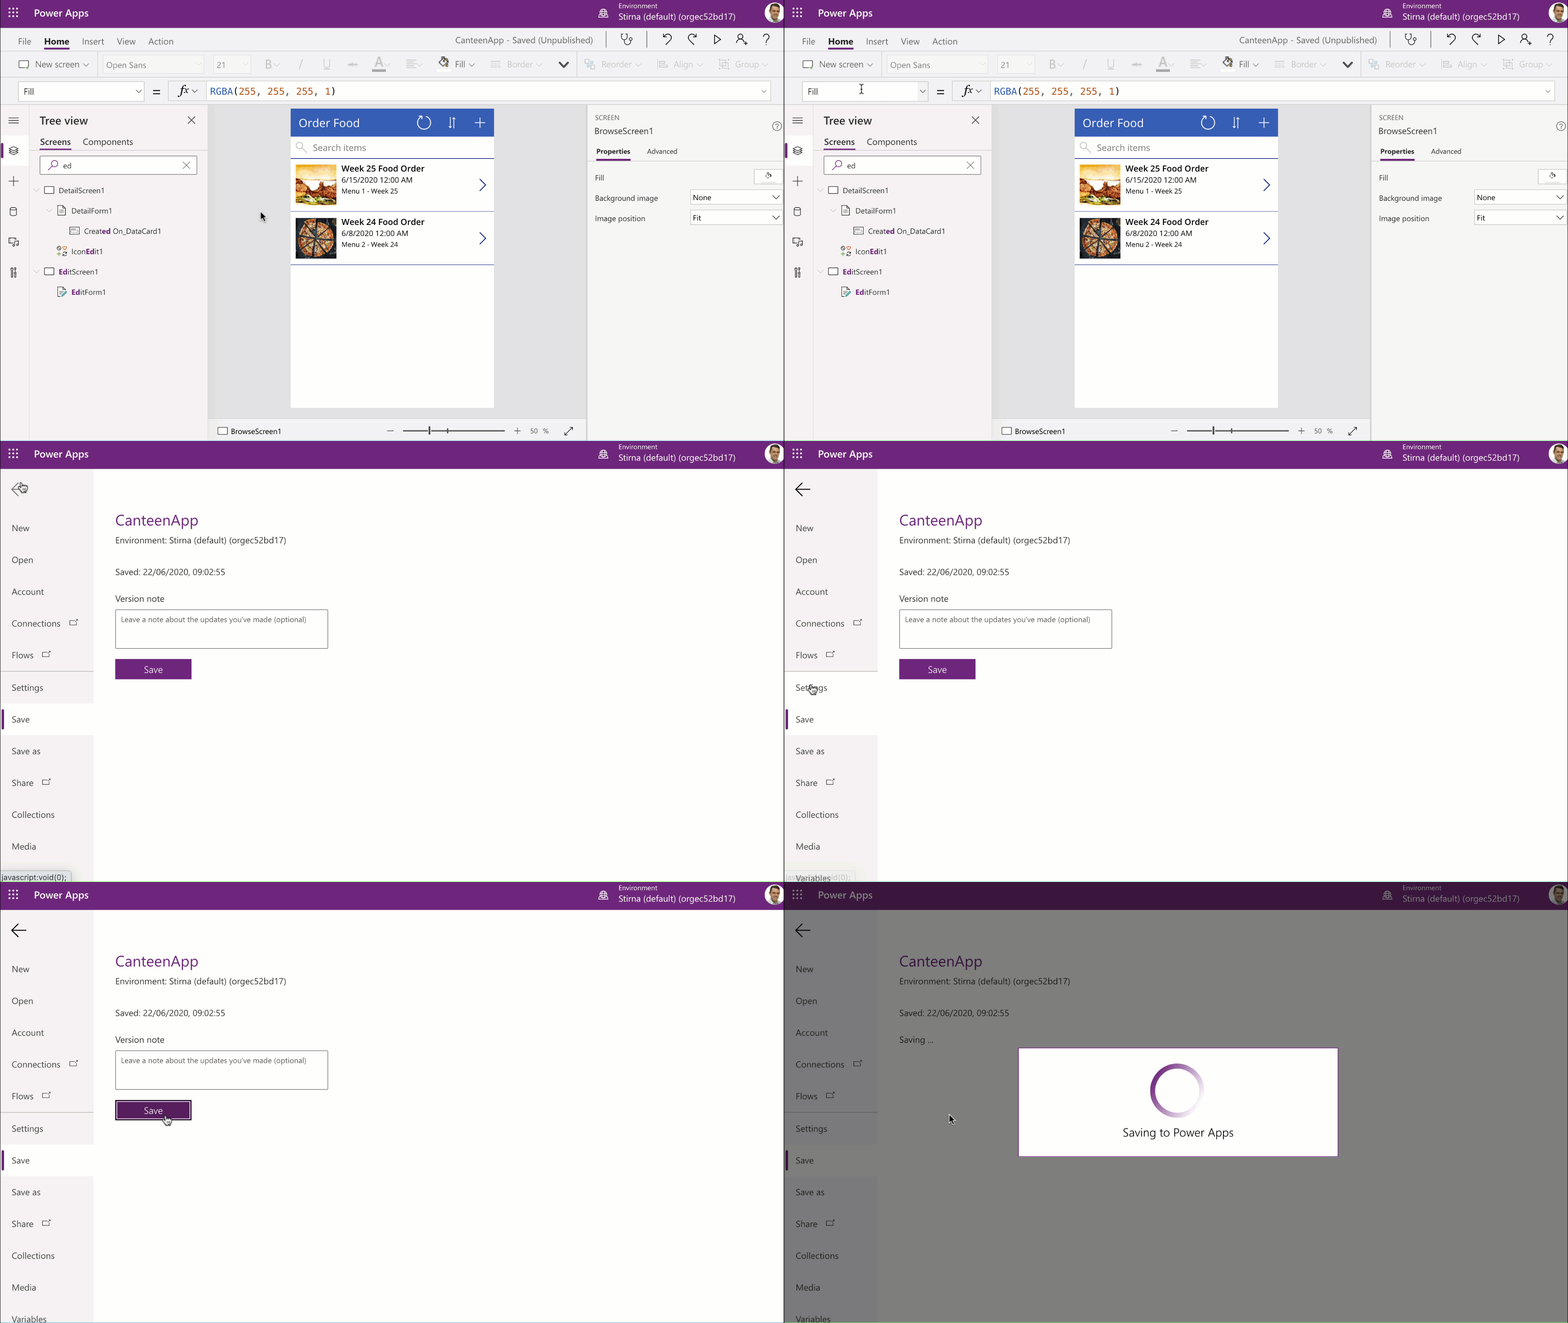
    1. Navigate to File → Save to save your app.
    This image shows how to save a canvas app.
    Save the app
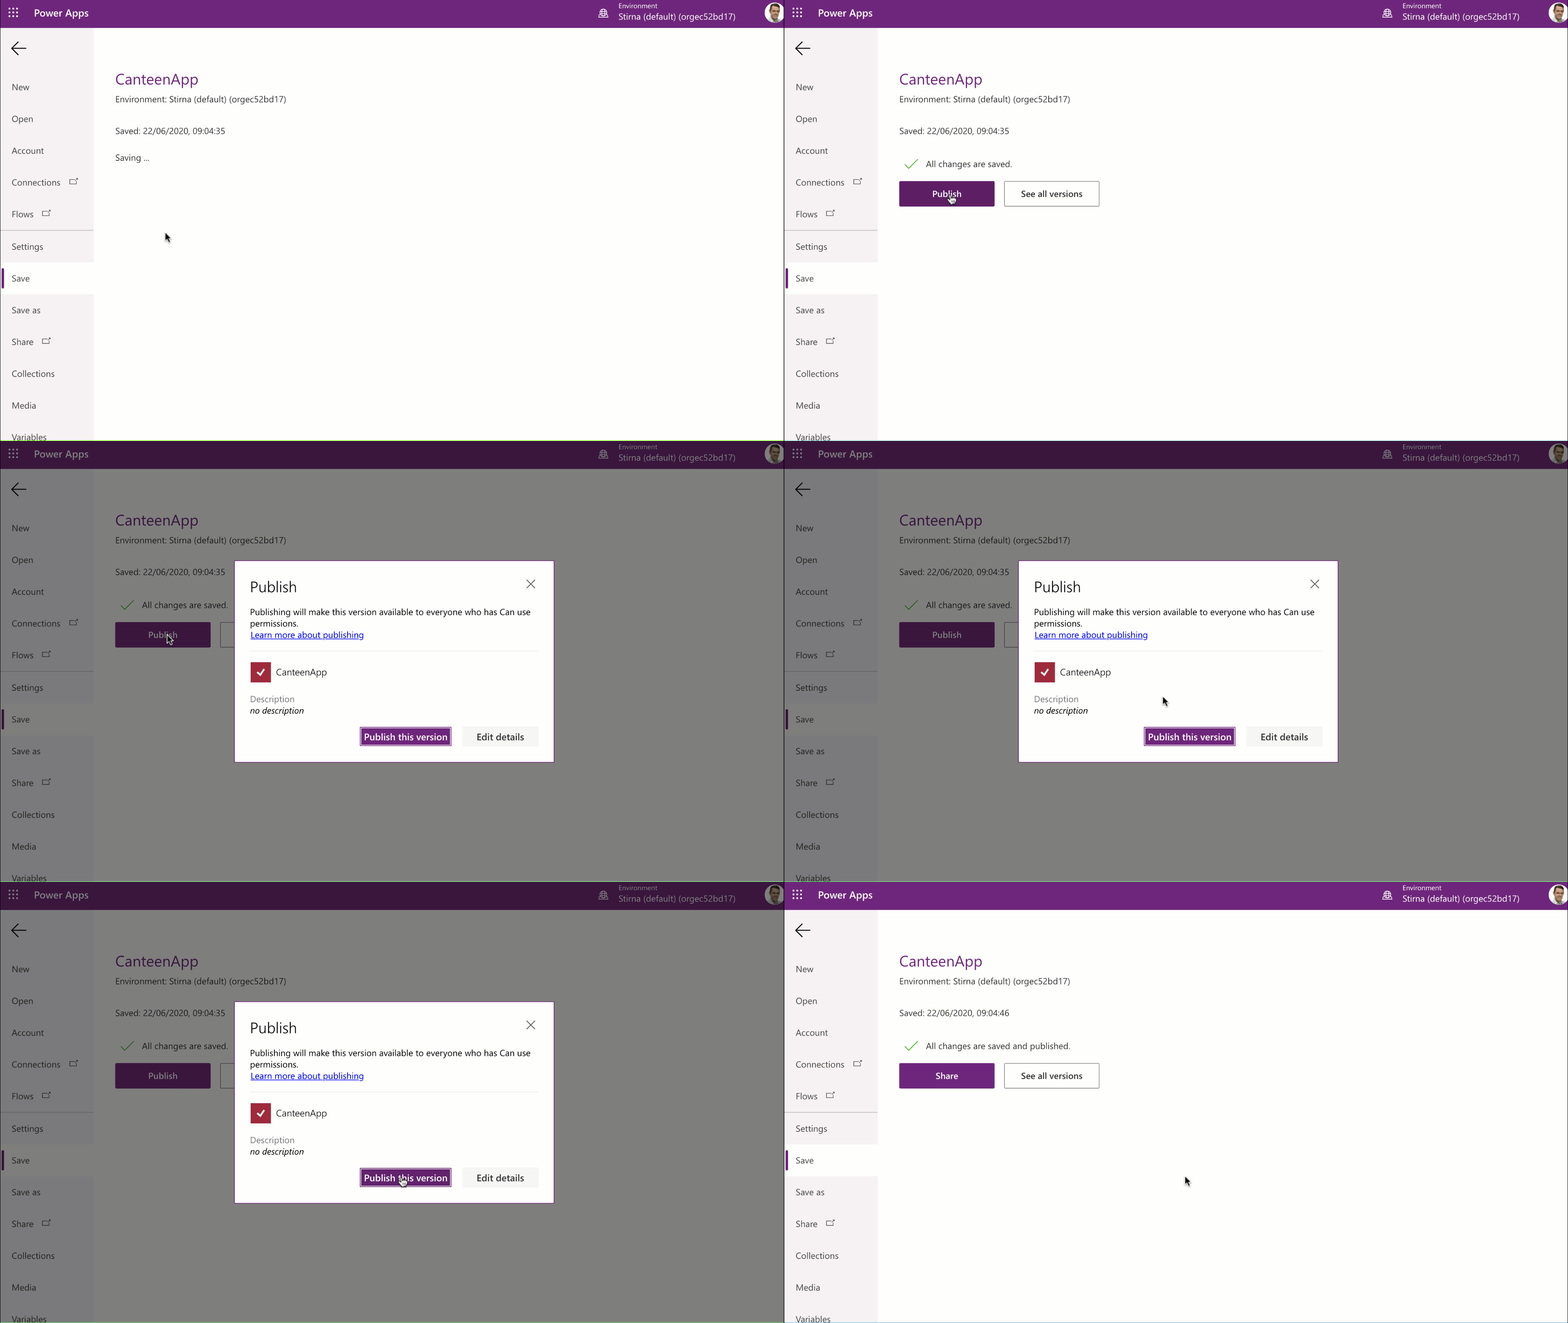
    1. As soon as you have saved the app you’ll see that a Publish button appears. Click on Publish. This will open a pop up window where you can add some information, publish the app or edit details.
    2. Choose Publish this version.That’s it. Your app has been published.
    This image shows how to publish a canvas app
    Publish the app

    4. Share the app

    The final step of the process is to share the app to get people to use it. If it is your first app, you will probably receive feedback for improvements. Don’t take it personally. Feedback is good when it comes to software because this way we can improve our product. Let’s go a head and share it with a colleague.

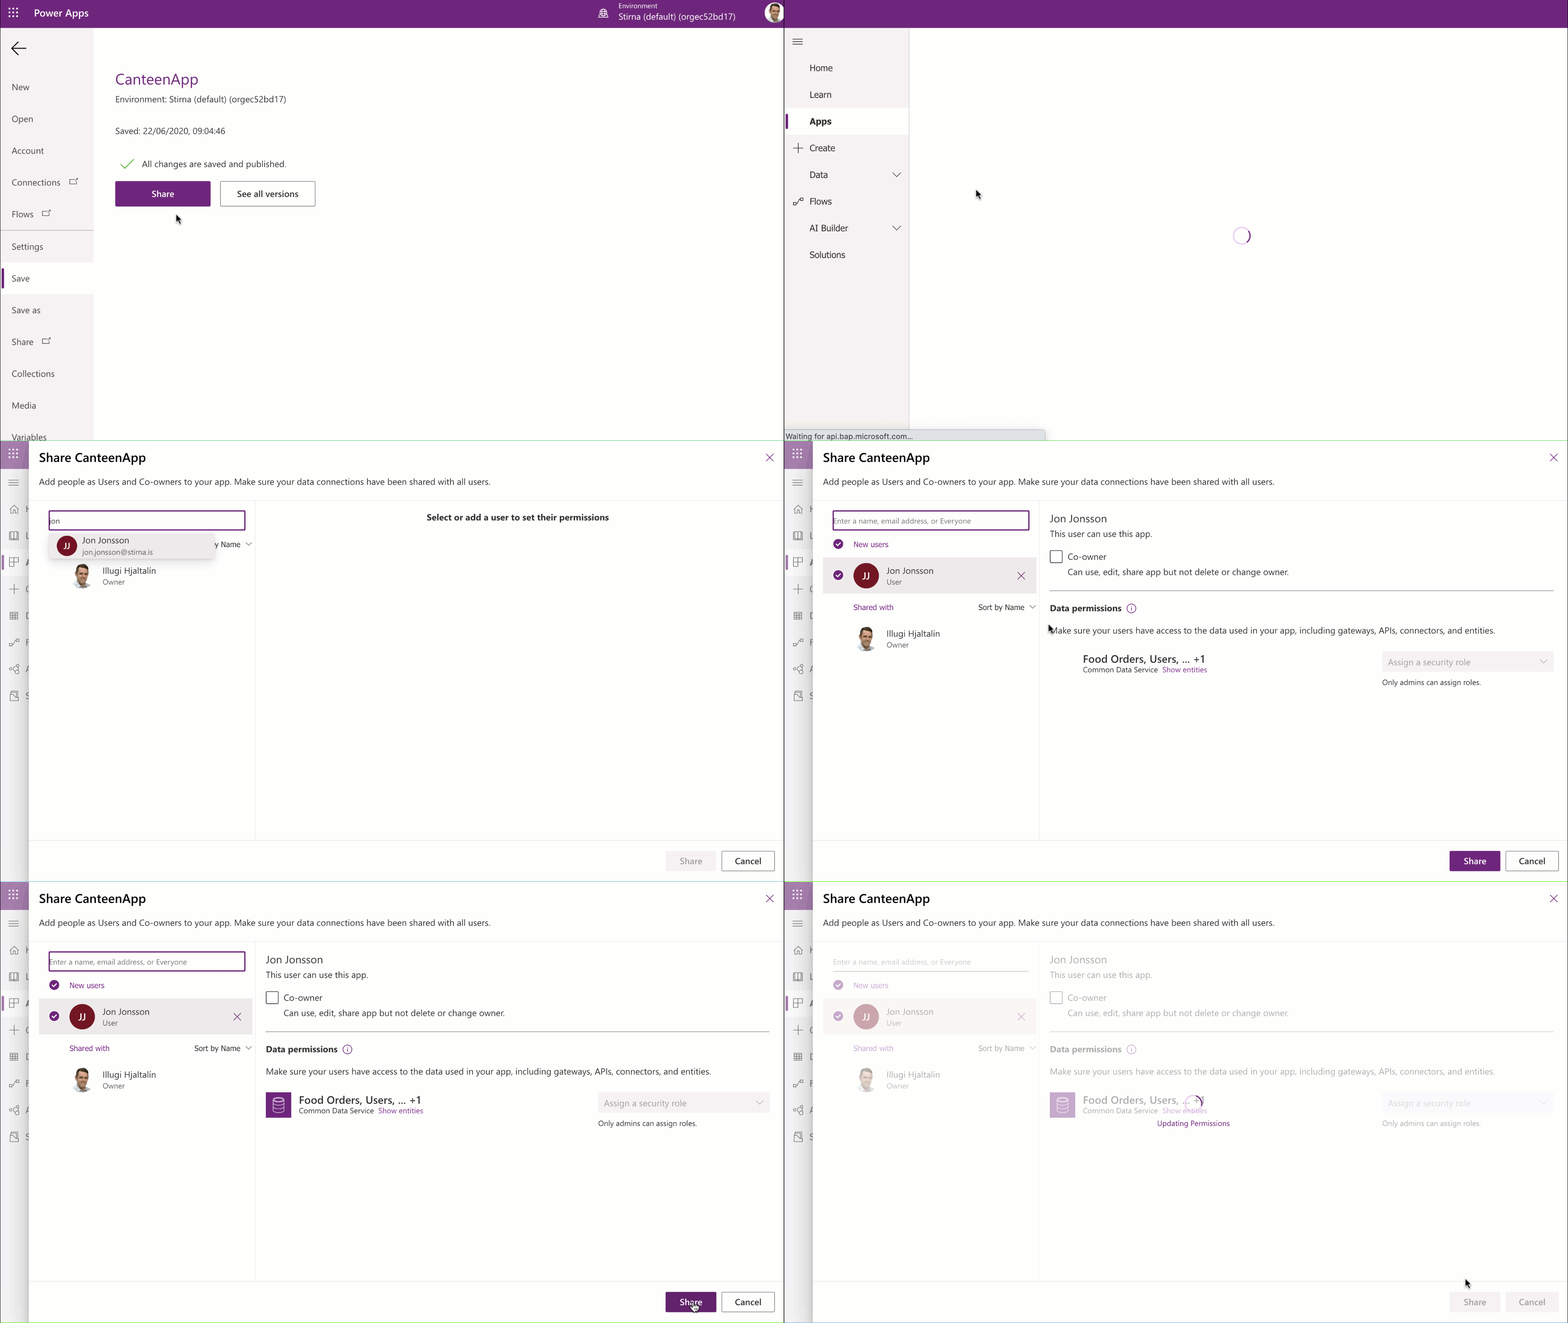
    1. Assuming that you are proceeding from Section 3 where you have saved and published the app. A screen appears where you have published the app offering you to share the app. You will see an option to share the app or see all versions of the app.
    2. Click on share.
    3. Type in the name or email address of the person who will receive the app. This contact has to have a license for Power Apps to be able to use the app.
    4. Select the user by clicking on the record.
    5. Assign a security role and click Share. Congratulations, you have now created, customized and shared a mobile app.
    Image showing how to share a canvas app
    Share the app

    Please note that Jon (or whoever you share the app with) will require a security role and the appropriate permissions to be able to use the app for more information see Microsoft docs.

    If you like this tutorial please subscribe to my Youtube channel and blog. Also, if you wan’t to create this app I created (see video below) feel free to contact me on the website and I’ll send you the solution file and share with you the template for the app.

    If you want to study Power Apps there are plenty of resources online. I’ll leave a few links at the end of the post.

    Video

    Chek out the video

    Online resources on Power Apps

  • My post about Net Promoter Score on CustomerThink

    My post about Net Promoter Score on CustomerThink

    A post written by myself just got published on CustomerThink, a highly ranked blog site. In the post I am discussing the benefits of using and implementing net promoter score to measure how satisfied customers are with your company’s products or services.

    Furthermore, the article has been published as an Editor’s Pick giving it a more prominent place on the website as well as it will be featured in the blog’s weekly newletter next week.

    As a taken of my appreciation, Stirna has decided to offer CustomerThink subscribers an hour of consultation for free! You can see the offer on CustomerThink’s Marketplace (valid until end of July) and you can subscribe to their newsletter here.

  • Customer survey sent after purchase part 3/3: Configure a flow

    Customer survey sent after purchase part 3/3: Configure a flow

    Task: Automatically send customer survey after an opportunity is won
    Difficulty: Medium
    Time to implement: 1-2 hours

    Content

    1. Creating the survey
    2. Configuring the email template
    3. Configure a flow

    In this article we will conclude this blog series by configuring a flow for our survey in Power Automate.

    (more…)