
Task: Automatically send customer survey after an opportunity is won
Difficulty: Medium
Time to implement: 1-2 hours
Content
- Creating the survey
- Configuring the email template
- Configure a flow
In this article we will conclude this blog series by configuring a flow for our survey in Power Automate.
Creating a flow
In our previous post, I created a survey email template for Power Automate. In the same editor we:
- Click on the ‘Configure a Flow’ button. We are then presented with options to create a flow from a template or start from scratch.
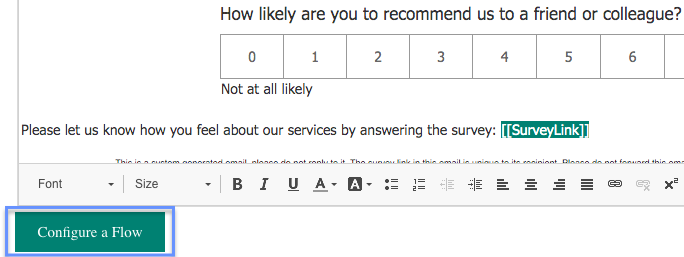
- Select ‘+ Create from blank’. This will open the flow builder inside of Forms Pro.
Configuring the flow
The flow that we need to build contains a few relatively simple steps. First, we need to define a so-called trigger. This is our opportunity record in Dynamics. Secondly, we must define a condition for sending out a survey, i.e. our opportunity being closed as won. In the latter case I feel that Dynamics 365 workflows are better because in a workflow you can see which options are available within an option set field (i.e. the label). In Power Automate, on the other hand, you can’t. The workaround is to find the numeric value of ‘Won’ in the option set (no very intuitive, I know). I’ve done this for you, so you don’t have to worry about it (however, I always encourage users to make tests before deploying).
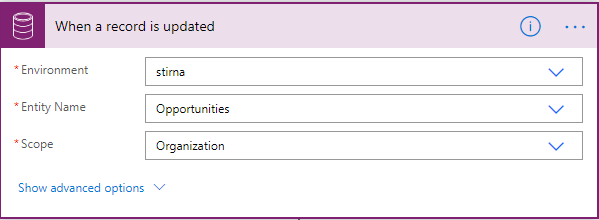
A) Check when an opportunity is updated
- For the first block we will search for ‘When a record is updated’ and choose a trigger from Common Data Service (CDS).
- Choose the appropriate environment in the first drop down list.
- Choose ‘Opportunities’ in the second drop down list.
- Make sure the Scope is set to ‘Organization’.
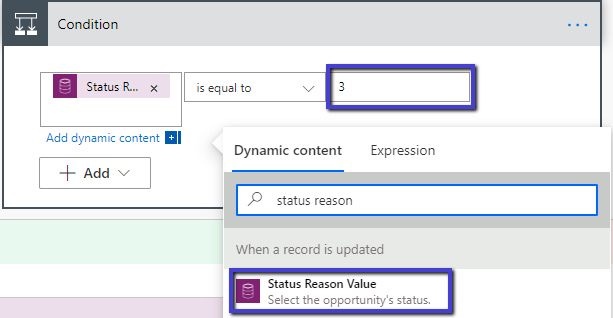
B) Insert a Condition step
- Click ‘+ New step’ below the blog. Now we have the trigger defined we must check whether the opportunity is won or not.
- Define the first field as ‘Status Reason Value’ via the Dynamic content.
- In the conditional statement choose ‘is equal to’.
- In the value field put ‘3’. This is the numerical value behind the ‘Won’ status reason.
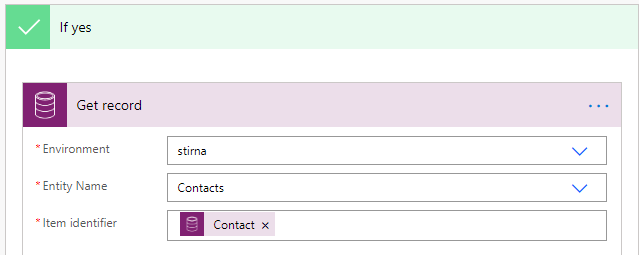
C) Get contact information
When we are working with an opportunity we must consider who is the survey respondent. Also, when will the survey be sent out. When I implemented this for a car dealer the survey was sent to a contact immediately after the opportunity was closed as won. The reason for this is that the salesperson waited for a few days before actually closing the opportunity. First the vehicle had to be delivered to the new owner and the salesperson phoning the buyer to see if everything was satisfactory. In this hypothetical case we assume that the sales team is working according to the a similar process. We will therefore retrieve the contact information and send the survey immediately after the opportunity has been closed as won. To get the contact info we:
- Click ‘+Add action’ inside the left-hand box labeled ‘If yes’ (this is the route our flow follows if the condition in B) is true).
- Search for ‘Get record’. This is again a CDS connector.
- Define which record type we want and from which environment.
- In the Item identifier field we select Contact from the corresponding field in our opportunity trigger that we defined in A). We can find this field again by using Dynamic content.
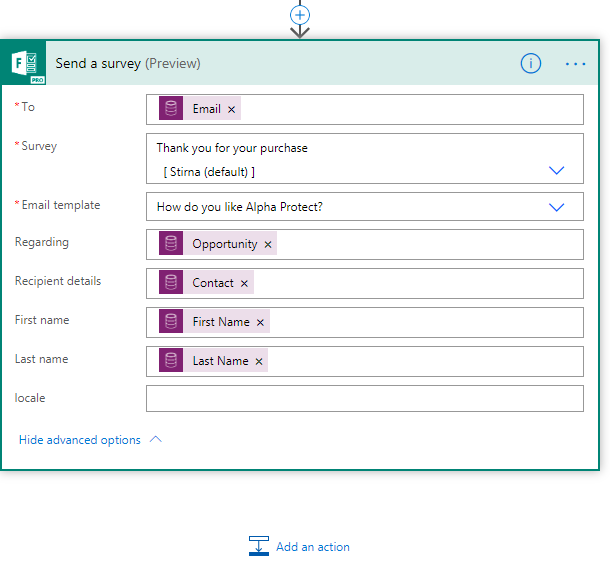
D) Send the survey
Now we have the contact information at our disposal. This gives us the chance to leverage information pertaining to the contact, such as his name, email address, etc. Forms Pro offers many out of the box variables which are part of its connector. This allows us to store information about the associated record in Dynamics as well as the contact information with each response we get from our respondents. With this data we can track which opportunities were successful and which ones were not. This can be quite valuable when it comes to service management and continuous improvement within the organization. To send the survey we:
- Click the ‘+ Add action’ button below the Get record action we created in our previous step. There are many options here so bear with me.
- In the To field insert the contact’s email. You can find this field in the Dynamic content.
- In the Survey field select the survey we created in my first blog post. In this case it is called ‘Thank you for your purchase’.
- In the Email template, insert the template we created in my second blog post. In this case I have called it ‘How do you like Alpha Protect?’.
- In the Regarding field, select the ‘Opportunity ID’ value of the opportunity record. This is important as we would like to know which record to associate the response.
- Complete the rest of the fields, Recipient details, First and Last names using the ‘Contact’ field from the opportunity, first and last names of the contact, respectively.
Testing the flow
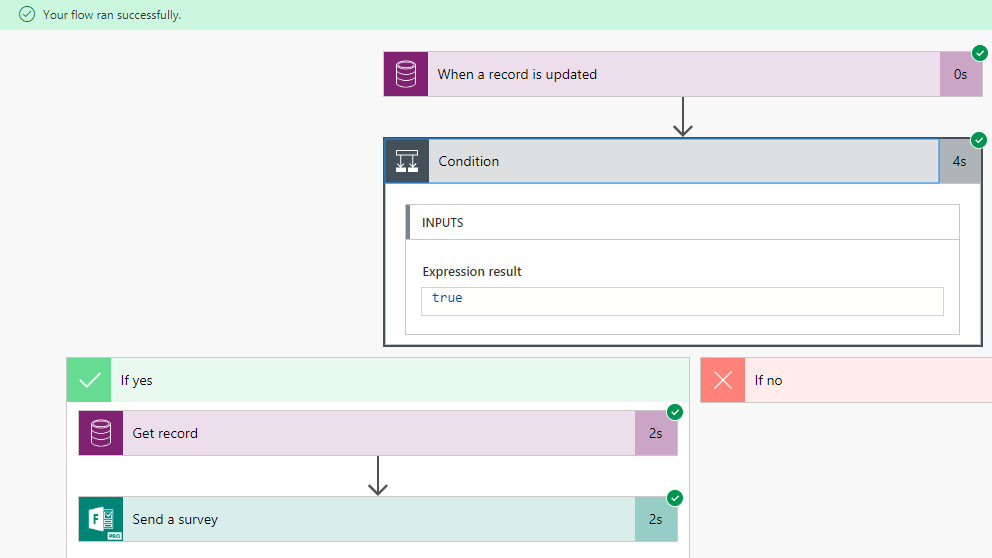
As always, we need to test our flow. To test the flow we:
- Click ‘Test’ on the top right corner of the flow builder.
- Choose ‘I’ll perform the trigger action’.
- Click Test.
- Go to our Dynamics 365 Sales and close an opportunity as won (if you haven’t created a dummy record before step 3, I suggest you do that and then redo steps 1-3).
- If the flow ran successfully you should see plenty of green check boxes on the steps you have defined in the preceding steps.
You can also watch how this is done by checking out the video below:
Leave a Reply