Category: Dynamics 365

  • Dynamics 365 CRM Solutions

    Dynamics 365 CRM Solutions

    A comprehensive guide to Microsoft Dynamics 365 Sales and Customer Service.

    What are the Different CRM Products and How Do They Differ?

    Dynamics 365 Sales

    Designed for sales teams to manage the entire sales lifecycle. It helps teams track leads, manage opportunities, forecast revenue, and close deals. Perfect for real estate agents managing property listings and sales pipelines.

    Best for: Sales teams, lead management, pipeline forecasting, deal tracking

    Dynamics 365 Customer Service

    Focused on customer support and service delivery. It enables teams to manage customer inquiries, track cases, maintain knowledge bases, and provide omni-channel support. Ideal for property management inquiries and after-sales service.

    Best for: Support teams, case management, service delivery, customer inquiries

    Key difference: Sales focuses on acquiring customers and closing deals, while Customer Service focuses on supporting customers throughout their journey and managing inquiries. For a comprehensive CRM, both modules work together seamlessly.

    What are the Specific Features of Each Product License?

    Each product (Sales and Customer Service) is available in two licensing tiers: Professional and Enterprise. The tier you choose determines which features are available to your team.

    Dynamics 365 Sales

    Professional:

    • Lead and opportunity management
    • Account and contact records
    • Product catalog and price lists
    • Quote and order management
    • Basic forecasting
    • Outlook and Teams integration
    • Mobile app access
    • Standard analytics and reports

    Enterprise (All Professional features, plus):

    • Advanced forecasting and revenue analytics
    • Territory management
    • Goal management and tracking
    • Enhanced customization (custom tables and processes)
    • AI-powered insights (Copilot, predictive scoring)
    • Advanced workflow automation
    • Broader Dataverse storage entitlements
    • Advanced reporting and analytics

    Dynamics 365 Customer Service

    Professional:

    • Case and ticket management
    • Customer knowledge base
    • Basic queue management
    • Self-service portal capabilities
    • Email and chat integration
    • Mobile case management
    • Standard analytics for agents
    • Basic SLA tracking

    Enterprise (All Professional features, plus):

    • Intelligent routing and skills-based assignment
    • Advanced SLA management
    • Resource scheduling and optimization
    • Omni-channel support unified across channels
    • Advanced automation (Power Automate integration)
    • Deeper analytics and dashboards
    • AI-powered insights and recommendations
    • Integration with other Dynamics 365 apps

    Integration and Productivity Tools (All Tiers):

    • Outlook Integration – Track emails, appointments, and tasks directly in Dynamics 365
    • Teams Integration – Access records and take actions without leaving Teams
    • Power Automate – Automate workflows, notifications, and task creation
    • Power BI – Create custom analytics and dashboards (Enterprise tiers enhanced)
    • Mobile Apps – Full access to records and functionality on smartphones and tablets
    • Portal Capabilities – Allow customers to self-serve without direct agent contact

    How is Pricing Structured?

    Microsoft Dynamics 365 uses a per-user, per-month subscription model. This means you pay for each named user who needs access, and billing is based on the license tier they use. There are no fixed-price options from Microsoft, though implementation services are billed separately.

    Current Pricing Structure (indicative USD monthly rates for 2025):

    User License Costs (Monthly per User):

    • Sales Professional: $65/user/month
    • Sales Enterprise: $95/user/month
    • Customer Service Professional: $50/user/month
    • Customer Service Enterprise: $95-105/user/month

    Example: 20-25 User Organization

    For a small-to-medium organization with 20-25 total users across Sales and Customer Service, a typical mix might look like:

    • Sales Professional (15 users): $65 × 15 = $975/month
    • Sales Enterprise (3 users): $95 × 3 = $285/month
    • Service Professional (5 users): $50 × 5 = $250/month
    • Service Enterprise (2 users): $100 × 2 = $200/month

    Total Monthly Subscription Cost: $1,710

    Implementation Services (Separate from Licensing)

    In addition to monthly user licenses, implementation and consulting services are billed separately. Stirna Consulting offers implementation, configuration, training, and support at €105/hour for CRM consulting, configuration, implementation, and training.

    Key Pricing Points:

    • Per-User Billing: You only pay for users who need access
    • Flexible Mix: Combine Professional and Enterprise licenses as needed
    • Scalability: Add or remove users as your team grows or changes
    • Discounts Available: Microsoft often provides discounts for multi-year commitments or bulk licensing
    • No Lock-in: Monthly billing with flexibility to adjust at renewal
    • Implementation Separate: Consulting and setup costs are additional and customized to your scope

    Comparing Models:

    Unlike some CRM systems with fixed-price plans, Dynamics 365’s per-user model means:

    • Transparent: You know exactly what you’re paying for
    • Scalable: Grow your system without major price jumps
    • Flexible: Pay only for the users and features you need
    • Enterprise-Grade: Access to Microsoft’s full support and updates

    Ready to Implement Dynamics 365 for Your Organization?

    Stirna Consulting specializes in designing lean, real estate-focused CRM implementations. We can help you assess fit, plan your phased rollout, and train your team—all at a fixed rate of €105/hour.

    Contact us at contact@stirna.is for a free consultation on Dynamics 365 CRM implementation.

  • Sending HTML emails through Dynamics 365

    Sending HTML emails through Dynamics 365

    Task: Send HTML email though Dynamics 365
    Difficulty: Advanced
    Time to implement: 1-2 hours

    Check out this video

    Tracking emails is a popular feature in Dynamics 365 Customer Engagement. You can track emails by connecting your mailbox with Microsoft Exchange and either use the Dynamics 365 app for Outlook or Dynamics 365 email capabilities to send out emails. Companies see great value in this feature because it allows them to have a CRM system in place where relevant interactions between a customer and an organization can be observed.

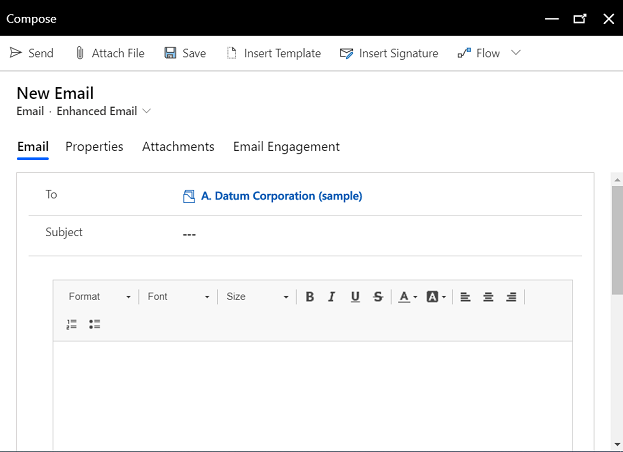
    In this post, I am going to show you how to use the Dynamics 365 emails and discuss some of its benefits and limitations in terms of functionality. Dynamics 365 emails are equipped with a simple email editor for creating emails. The editor covers the basic requirements for what you would normally use when sending an email from your email client such as Gmail or Outlook.

    Email editing experience in Dynamics 365

    Dynamics 365 emails allow you to send emails to multiple recipients, add attachments, insert links and images. However, if you want to create your own HTML email you cannot do that through Dynamics 365 emails. This could be useful in scenarios where the company wants to send out a promotional emails, e.g. because there is a new product release or an event. Dynamics 365 does not support HTML emails.

    On the other hand, if you like to send HTML emails through Dynamics 365 there is a workaround. By leveraging Power Automate and the Dataflex (CDS Current enviornment) connector, you can create a workflow that creates and sends an email with HTML content.

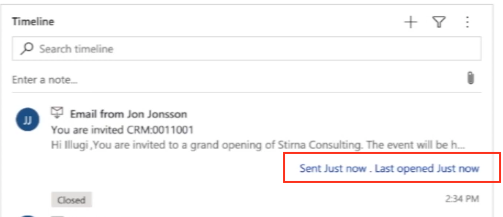
    For example, you have a lead that you would like to send an event invite to. You can achieve this by creating a flow in Power Automate and use a field on the lead to trigger the flow. The salesperson could simply check a box on the lead form to send the invitation. Furthermore, the email would be automatically tracked in Dynamics 365. This gives the salesperson and her manager a better overview of who has received an invitation to an event.

    In the remainder of this post I will show how you can create and send a HTML email through Dynamics 365 Sales with the help of Power Automate.

    1. Create the flow

    1. You start by navigating to make.powerapps.com and create a solution for your Flow. For information on how to create a solution in Power Apps please refer to this article.
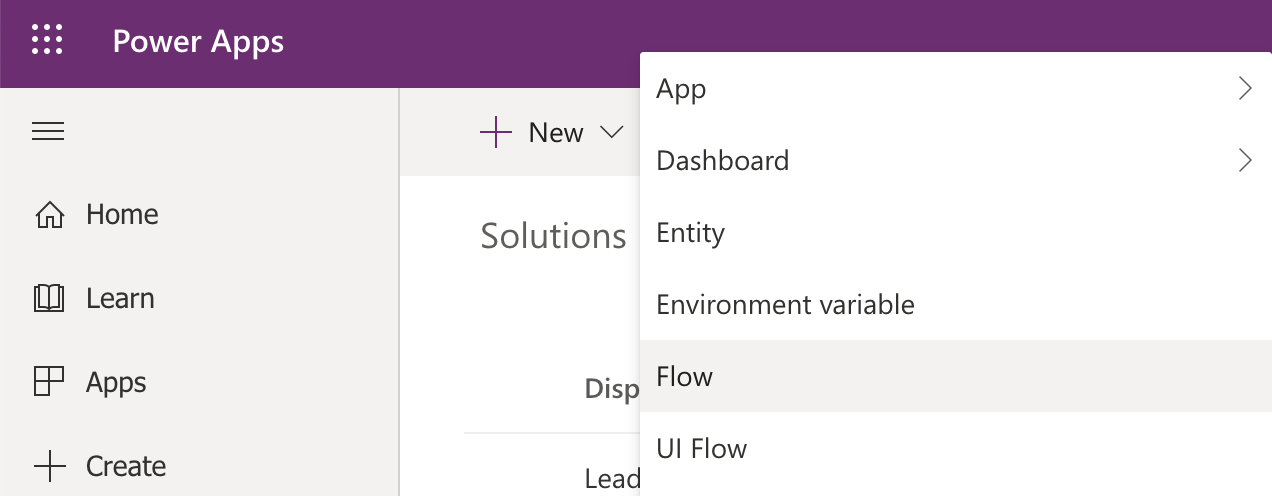
    2. Click on the ‘+New’ button and select Flow
    Create a Flow from within a Power App solution
    Create a Flow from within a Power App solution
    1. Search for and select the Dataflex ‘When a record is created, updated or deleted’ trigger (Common Data Service current).
    2. Give your Flow a name.

    2. Configure the flow

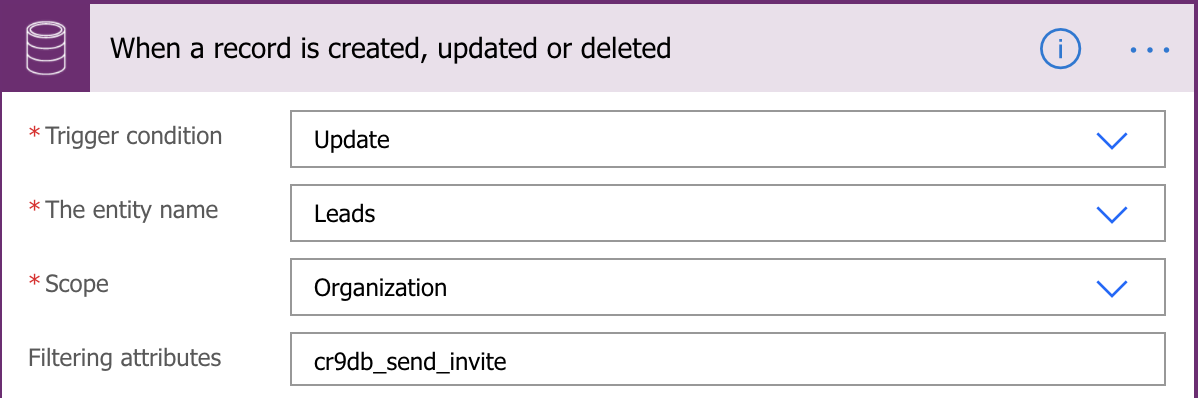
    Once you have created the flow you can define the entity name, the type of trigger condition as well as the filtering attribute for the newly created trigger. In this case we have created a custom field which will serve as the trigger for this flow or the filtering attribute.

    1. In trigger condition choose Update.
    2. In the entity name choose Leads.
    3. For the Scope select Organization.
    4. In the filtering attribute write the name of your custom field.
    Dataflex 'When a record is created, updated or deleted' trigger (Common Data Service current)
    The When a record is created, updated or deleted trigger (CDS current)

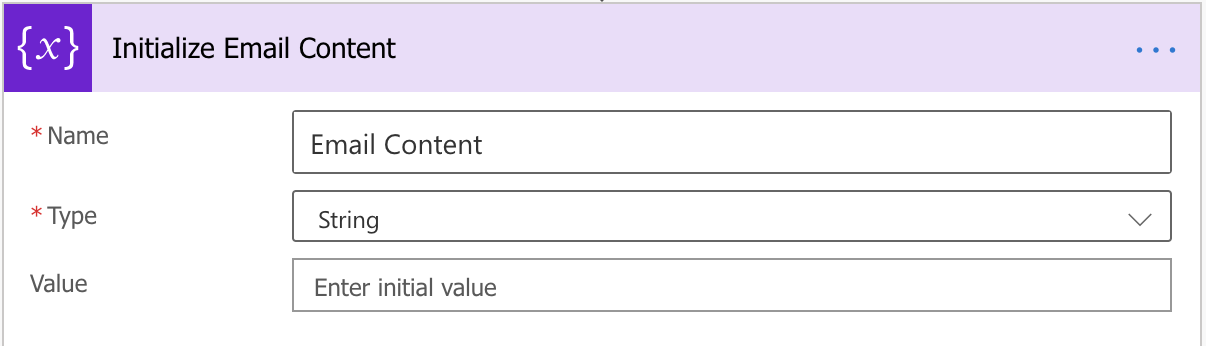
    Next we need a variable to store our HTML. To do this we:

    1. Click on the ‘New Step’ button.
    2. Select Initialize variable.
    3. Give our variable a name and choose type string. Leave the value field empty.
    Power Automate Initialize variable
    Initialize variable

    Before we set the variable you first want to check if our field value meets the condition.

    1. Click on the ‘New Step’ button.
    2. Select control.
    3. Choose control condition.
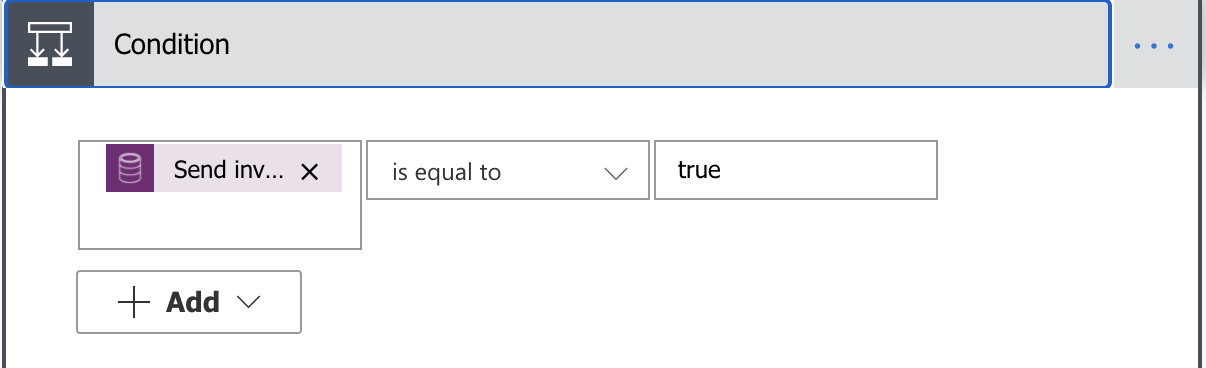
    4. For the condition choose the custom field and that it should be equal to ‘true’. The field is a two option field which can be either true (1) or false (0).
    The condition should be that send invitation value is true.

    When the condition is true you want the email to be sent. First you need to set the variable we created in our previous step and then you will create the email. Lastly you want to send the email message using a bound action.

    1. In the ‘If yes’ box click ‘Add an action’.
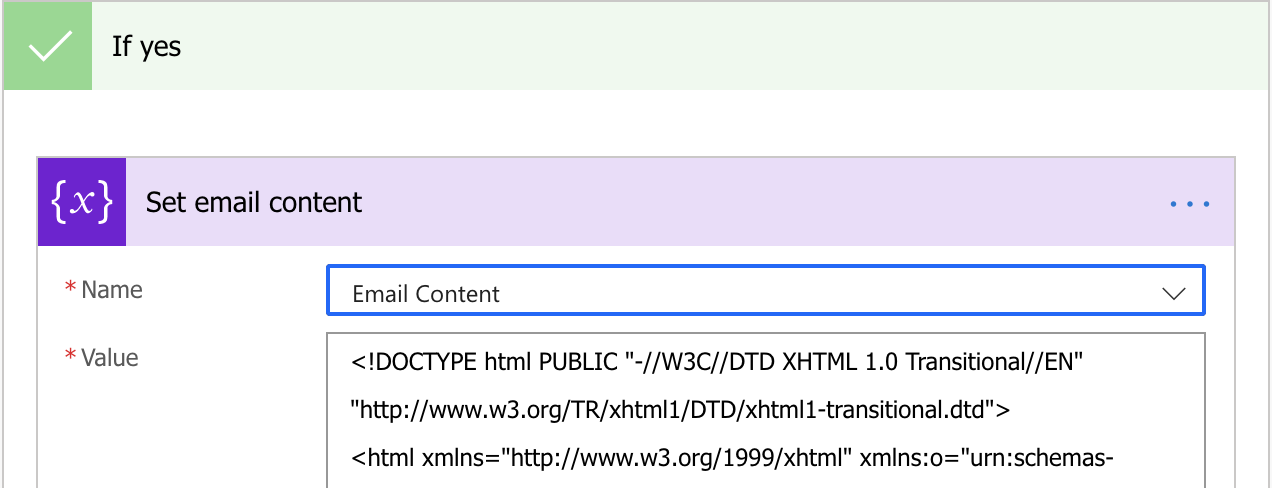
    2. Choose Set variable.
    3. In the name select the variable you initialized in steps 2.6-2.7.
    4. In the value field paste in your HTML code.
    Set variable and have it store the HTML code

    Now you have created the condition and set the variable. This leads to the creation of the email message. To create the message you:

    1. Below the ‘Set email content’ action click ‘Add an action’.
    2. Choose Create a new record – Dataflex (Common Data Service current).
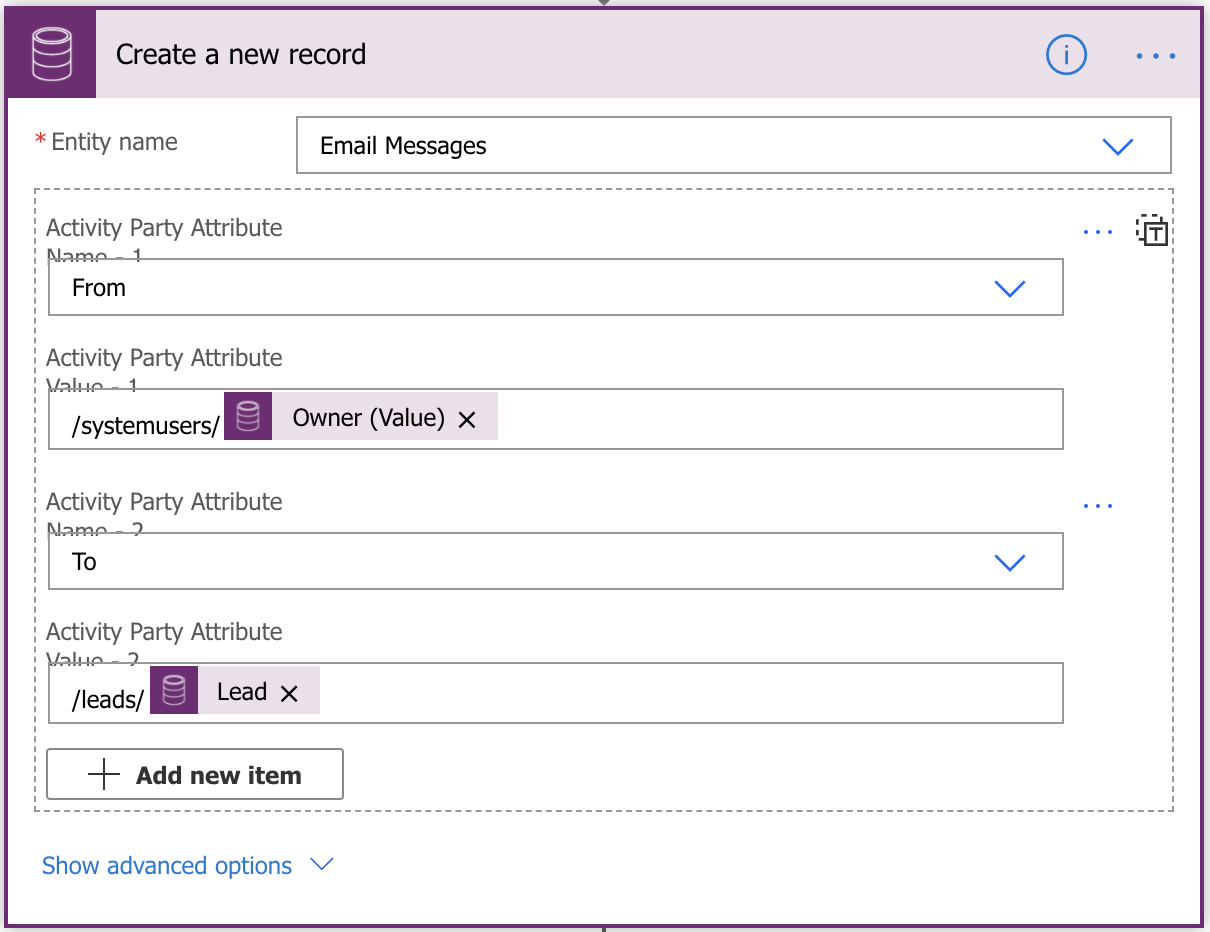
    3. For the email message choose the sender and receiver of the message. You must refer to the entity’s path as shown in the following screenshot. For more info about how this connector’s attributes are referenced see this article.
    How lookup fields are referenced in the create a new record current action
    How lookup fields are referenced in the create a new record current action
    1. Click ‘Show advanced options’ and add the email body to the ‘Description’ field, owner in the ‘Owner (Owners)’ field, the lead (‘/leads/{the lead GUID value}’) in the ‘Regarding (Leads)’ field, and the subject in the ‘Subject’ field.

    The final step is to send the email. This requires a special kind of action called a bound action. To see the difference between bound and unbound actions please refer to this article.

    1. Below the ‘Create a new record’ action click ‘Add an action’.
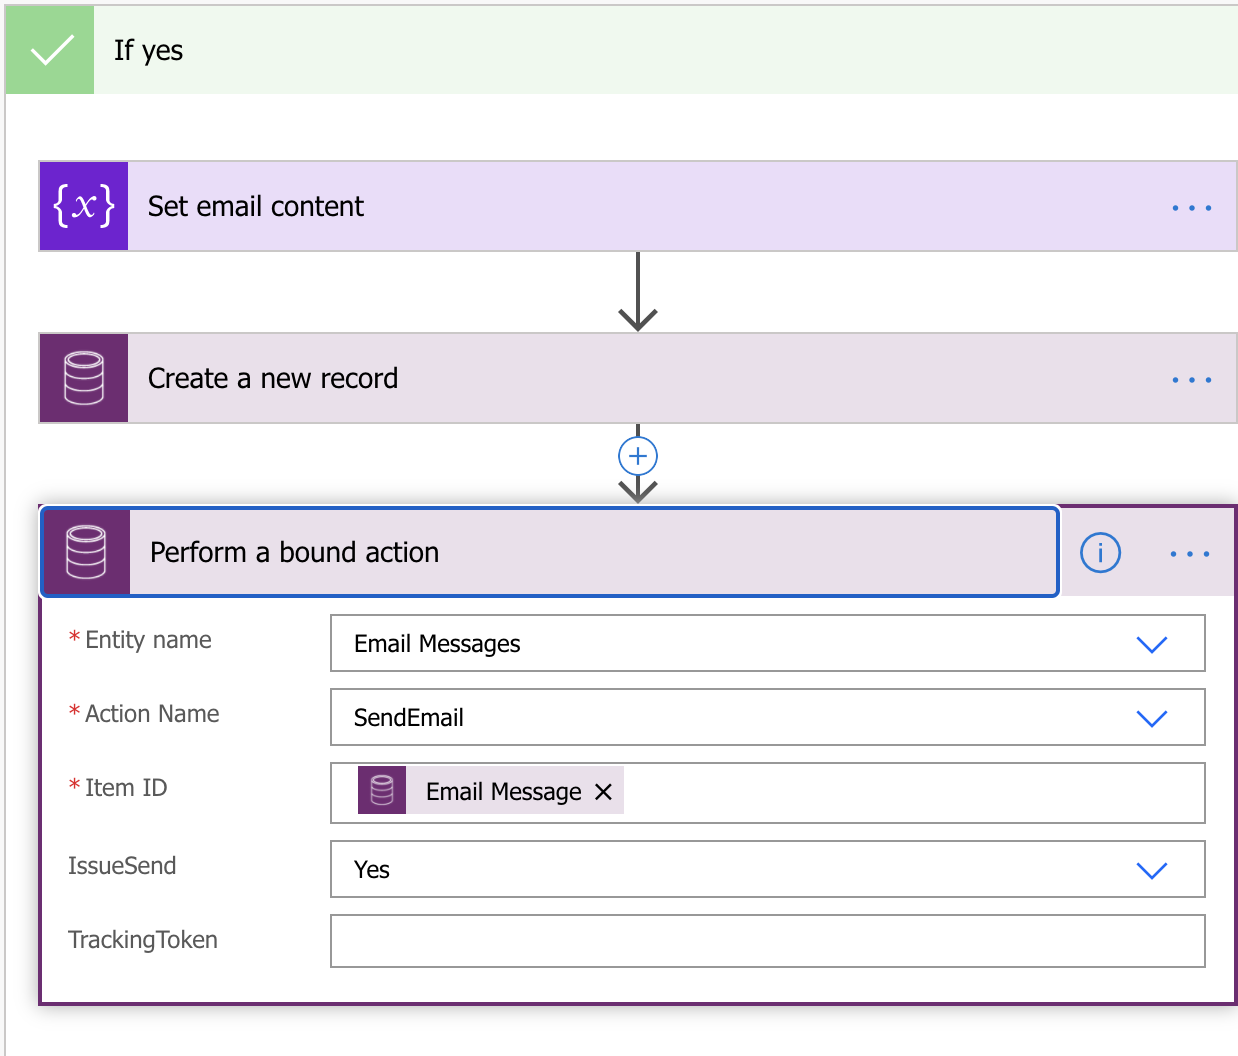
    2. Choose Perform a bound action – Dataflex (Common Data Service current).
    3. In the Entity name choose Email Messages
    4. For the Action Name choose SendEmail.
    5. In the Item ID insert the Email Message ID. You find the ID by using the dynamics content and choosing the unique ID of the email message you created in steps 2.16-2.19 above.
    6. In the IssueSend select Yes.
    Perform a bound action - Dataflex (CDS current) trigger
    Perform a bound action – Dataflex (CDS current) trigger

    3. Test the flow

    You can now test your flow to see if everything works as it should. Do a test run on a lead in your Dynamics 365 Sales to verify that the flow runs when the custom field is changed on the lead and if the email is sent when the flow condition is true. For more information about performing the test, please refer to the blog post’s video above.

  • Integrate your website with Dynamics 365 Sales

    Integrate your website with Dynamics 365 Sales

    Task: Integrate your website with Dynamics 365 Sales using Parserr parsing software
    Difficulty: Advanced
    Time to implement: 1-2 hours

    I am quite excited about sharing with you a great discovery I made when surfing the web looking for new ways to handle automatic record creation in Dynamics 365 from emails messages. In my research, I came across a parsing tool that enables you to create any record in Dynamics 365 based on form submissions and email messages.

    (more…)
  • Customer survey sent after purchase part 3/3: Configure a flow

    Customer survey sent after purchase part 3/3: Configure a flow

    Task: Automatically send customer survey after an opportunity is won
    Difficulty: Medium
    Time to implement: 1-2 hours

    Content

    1. Creating the survey
    2. Configuring the email template
    3. Configure a flow

    In this article we will conclude this blog series by configuring a flow for our survey in Power Automate.

    (more…)
  • Customer survey sent after purchase part 2/3: Create an email template

    Customer survey sent after purchase part 2/3: Create an email template

    Task: Automatically send customer survey after an opportunity is won
    Difficulty: Medium
    Time to implement: 1-2 hours

    Content

    1. Creating the survey
    2. Configuring the email template
    3. Integration

    In this article we will continue working in Forms Pro and build an email template with dynamic content from Dynamics 365.

    (more…)
  • Customer survey sent after purchase part 1/3: Create the survey

    Customer survey sent after purchase part 1/3: Create the survey

    Task: Automatically send customer survey after an opportunity is won
    Difficulty: Medium
    Time to implement: 1-2 hours

    Content

    1. Creating the survey
    2. Configuring the email template
    3. Integration

    In this three-part blog series we’ll be looking at a scenario which I have implemented for a client where a car dealership selling a new car sends a survey post-purchase to a customer and asks about his experience with the purchase and how likely he will recommend the company to his friends.

    (more…)
  • Lead generation with webforms part 3/3: Connecting with Dynamics 365

    Lead generation with webforms part 3/3: Connecting with Dynamics 365

    Task: Create a lead in Microsoft Dynamics 365 Sales from a web form submission
    Difficulty: Easy
    Total time to implement: 1-2 hours

    Content

    1. Creating the form (read post)
    2. Embedding the form on a webpage (read post)
    3. Connecting the form with Dynamics 365
      1. Creating a flow
      2. Configuring the flow
      3. Testing the flow

    In this last part of my three-part blog series, I’ll show how you can leverage a Microsoft Power Automate flow to automate the task of creating a lead record from a form submission. While in previous posts we have already created a web form, published it and embedded on a webpage, in this post we will create a flow that will create a lead record in Dynamics 365 Sales and send a couple of emails.

    (more…)
  • Lead generation with webforms part 2/3: Embedding the form

    Lead generation with webforms part 2/3: Embedding the form

    Task: Create a lead in Microsoft Dynamics 365 Sales from a web form submission
    Difficulty: Easy
    Total time to implement: 1-2 hours

    Content

    1. Creating the form (read post)
    2. Embedding the form on a webpage
      1. Publishing the form
      2. Embedding on your site
    3. Connecting the form with Dynamics 365 (read post)

    In the current post we’ll publish the form we created in the previous post and embed it on a webpage.

    (more…)